Fold It! Create 3-D Works of Art
Let’s explore some folded works in the VMFA collection—and experiment with folding to make art.
Beyond “Flat Land”
Flat materials can be cut into many shapes and sizes and folded in various ways to make interesting 3-dimensional works of art. Let’s explore some folded works in the VMFA collection—and experiment with folding to make art.
(These activities are designed to require increasing skill levels for students. The last two may need to be adapted for younger students.)
Note for Teachers: Scaffolding Opportunities!
To help your students build their understanding of shape and form, try selecting activities from the three sets of related VMFA resources described below. Each set of activities is scaffolded to move from simple to more complex activities. Pick and choose the best combination of lessons for your classroom.
- The Get into Shape gallery hunt and associated activities in Exploring Shape: Squares, Rectangles, Circles, and More focus on flat geometric and organic shapes.
- The Fold It, Bend It, Shape It gallery hunt and Fold It! activities (offered in this resource) leave “flat land” to investigate and make folded shapes.
- The Build It! gallery hunt and associated activities in Constructing Art: Catching the Viewer’s Eye examine 3-D structures and offer hands-on construction challenges.
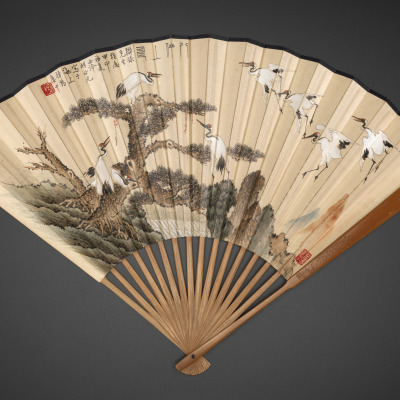
Chinese Folding Fan Features Landscape and Poetry
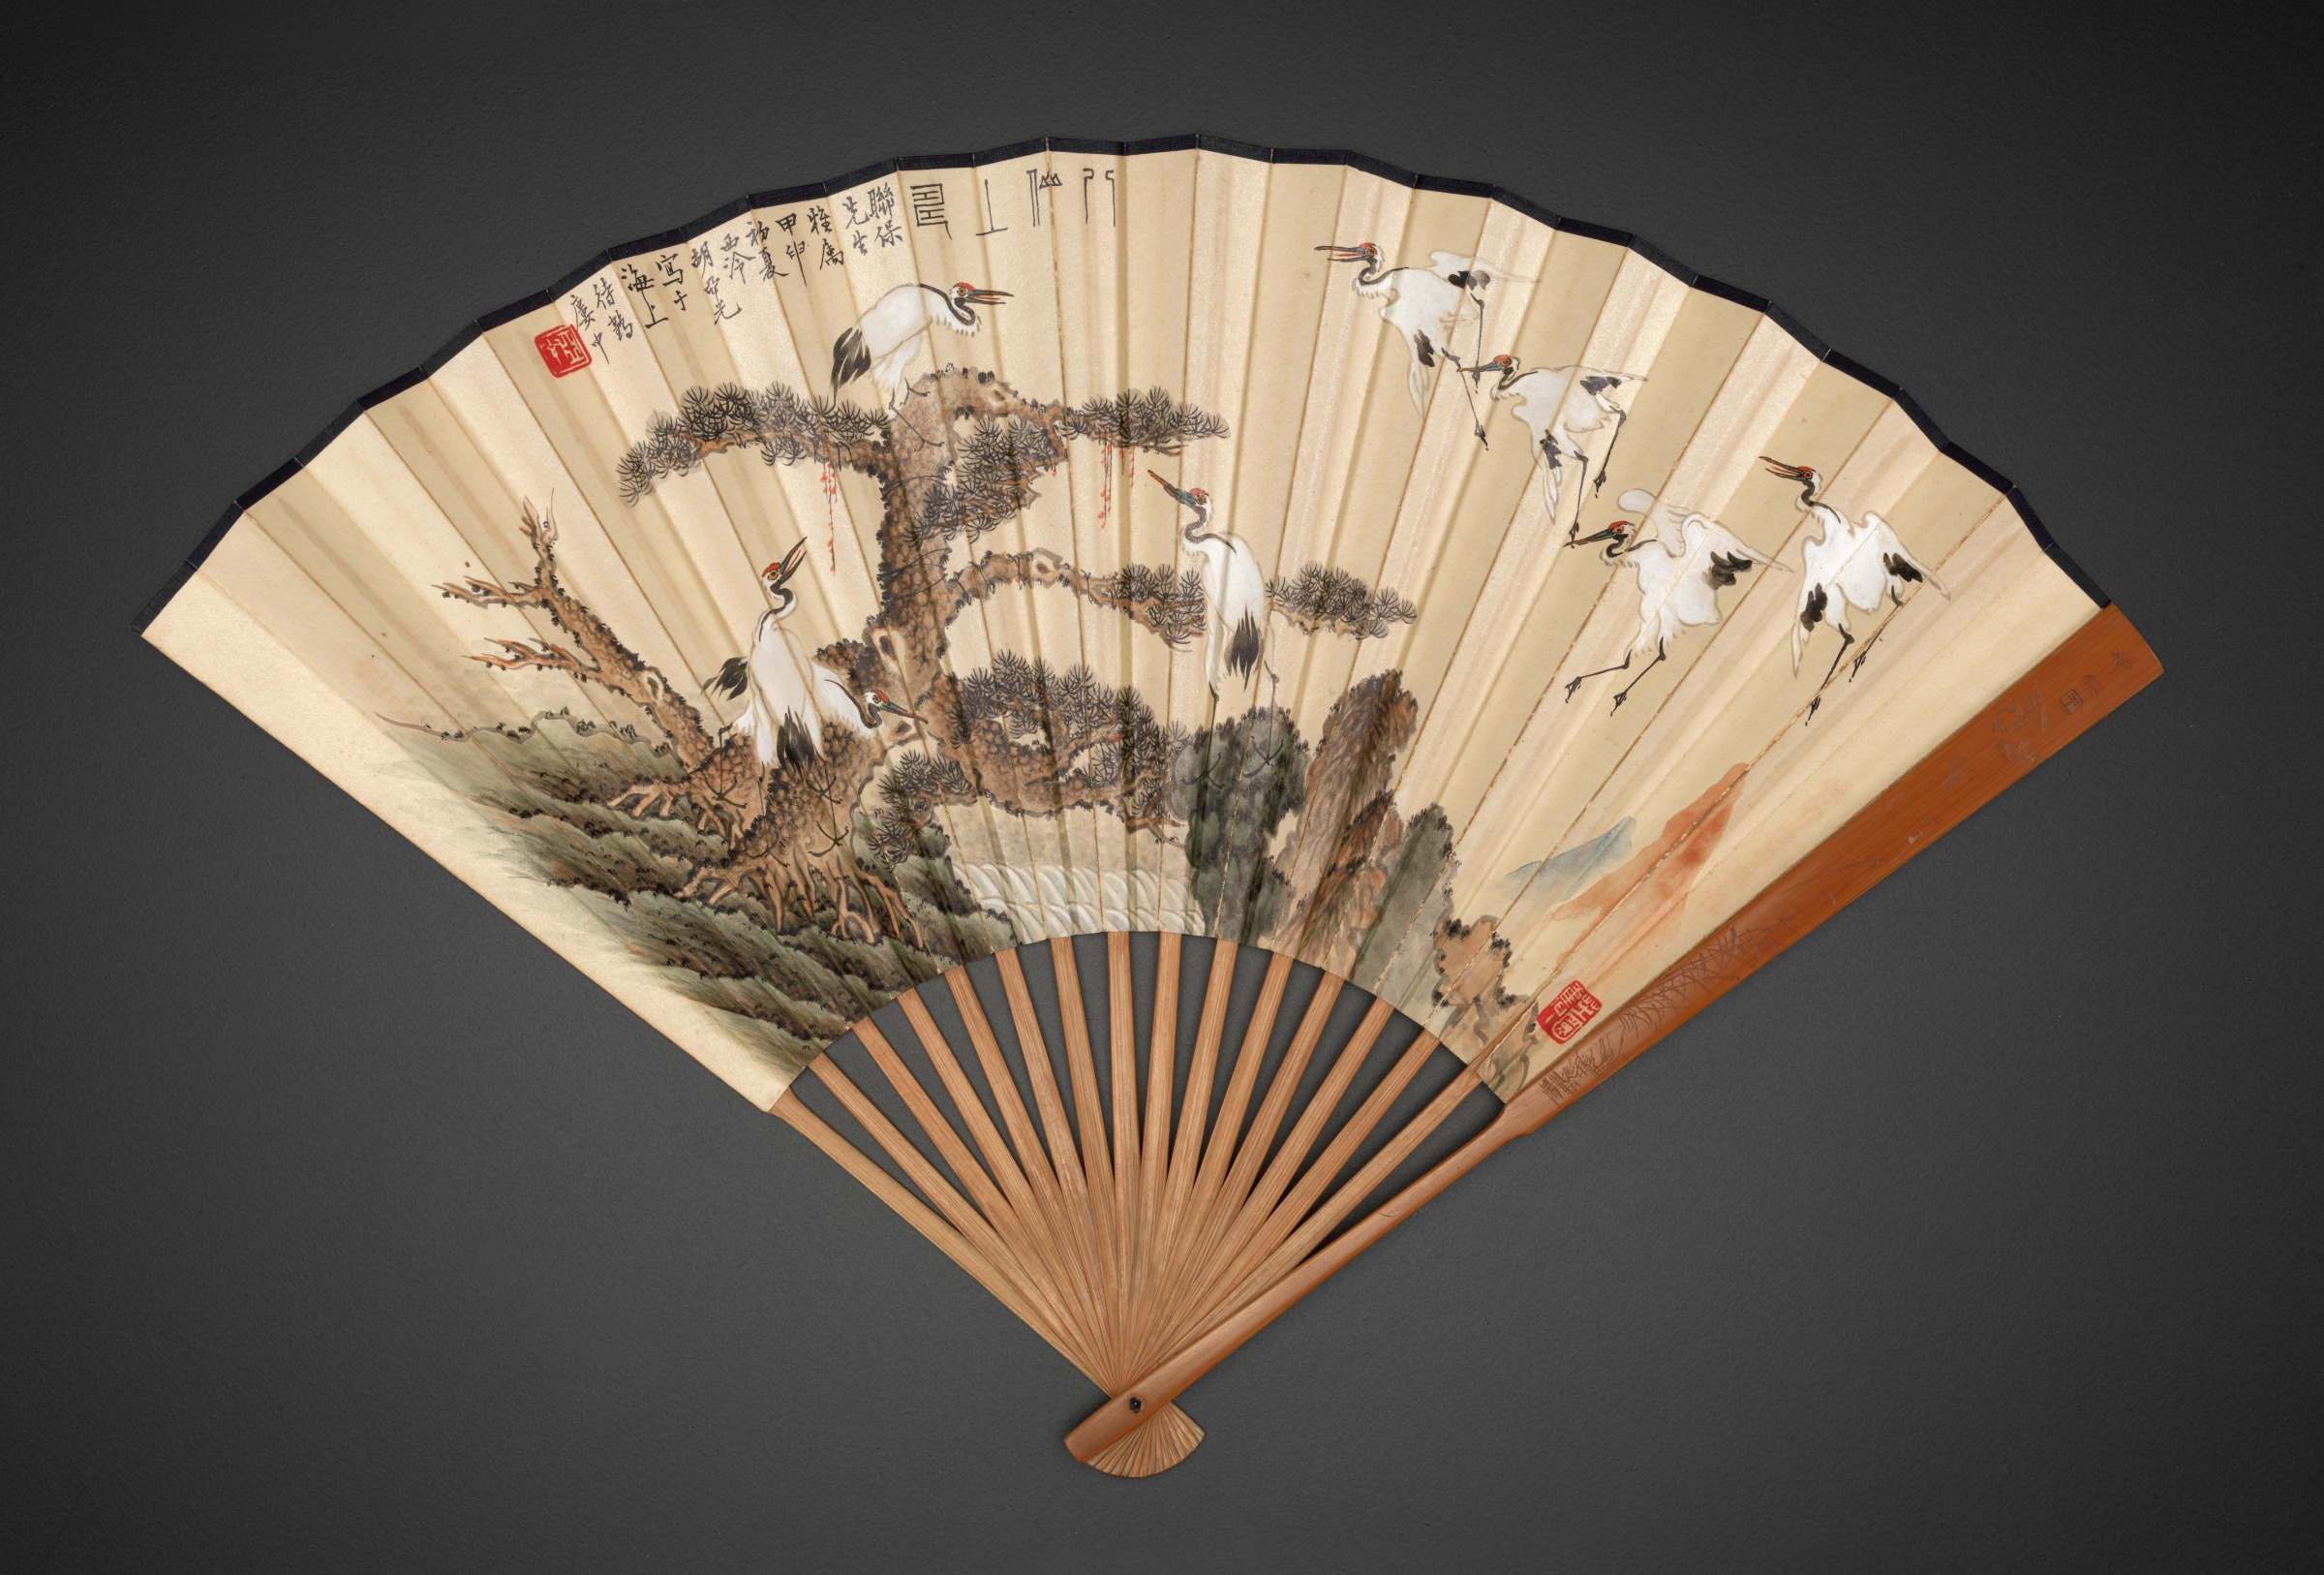
Did you know that people have been using fans for around 2,000 years? Fans appear in wall carvings from ancient Egypt and other areas of the Middle East. Some were made from feathers, but others were woven. The ancient Chinese also used fans, but scholars believe that folded fans, like the one pictured here, developed in Japan. Tradition suggests that the idea for the folding fan came from observing the wings of bats.
This folding fan was painted by a Chinese artist and scholar named Zhang Yuanji. In addition to his talents as a painter, Zhang Yuanji also wrote poetry and essays and worked as a publisher!
Cranes and pine trees, like those that decorate the fan, are symbols of long life. When the two are shown together, they bring to mind the wish called song ling he shou, or “live as long as pine and a crane.”
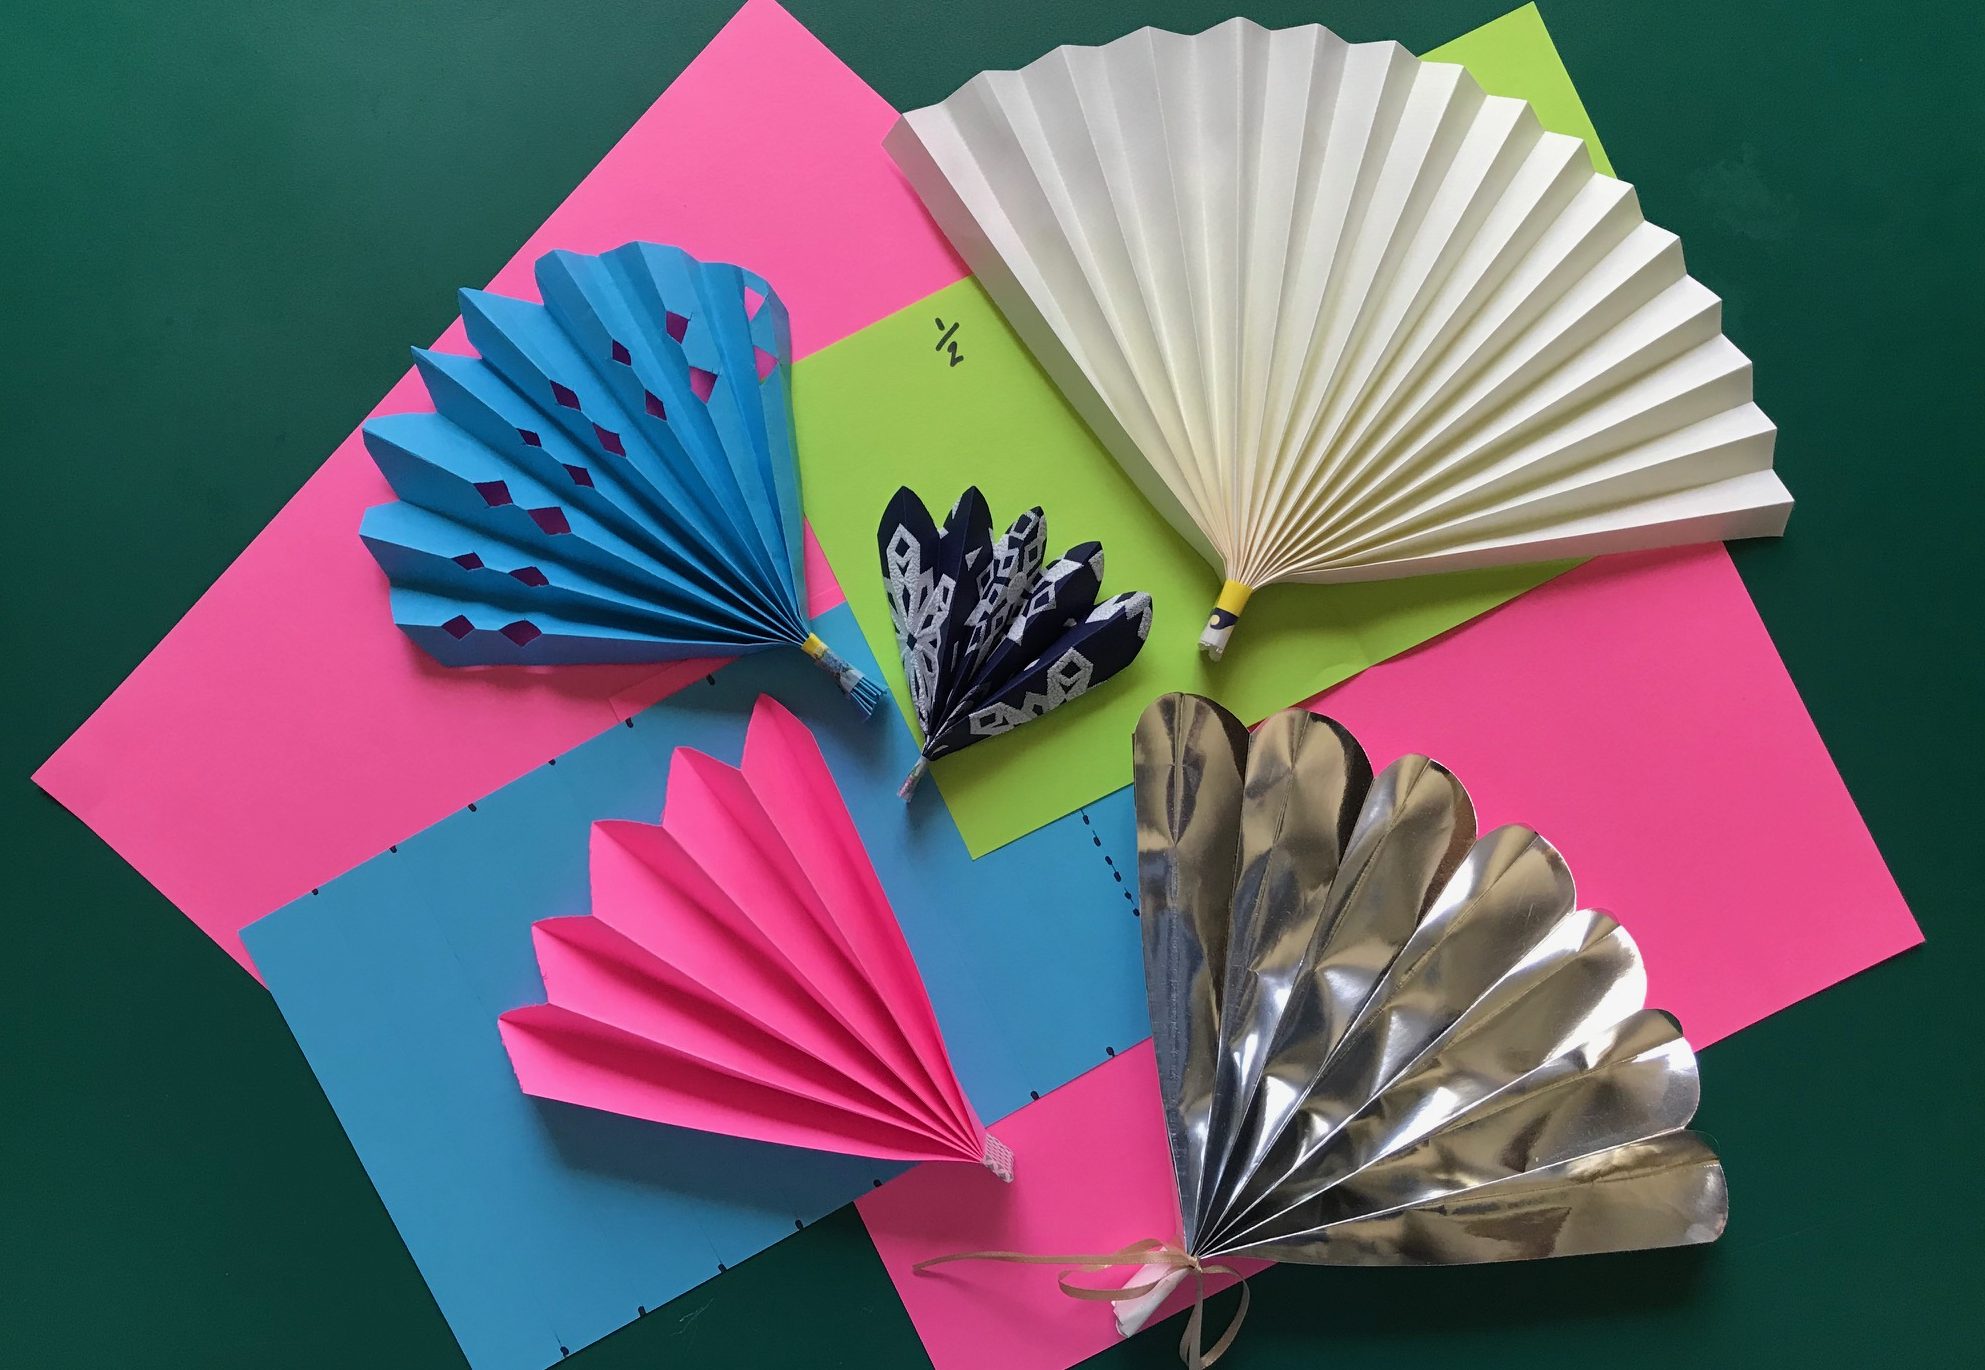
Make a Folded Fan!
You’ll need:
- a piece of 6” x 10 “paper (These dimensions make it easy to create 10 one-inch flaps with 9 creases. The thinner the paper, the easier it will be to fold. Try using some leftover birthday or holiday wrapping paper.)
- ruler (if you want to mark the intervals of the folds)
- scissors
(for trimming your paper or cutting designs into the top or side of your paper) - plastic picnic spoon and/or knife
(for pressing down the creases or scoring your paper). - colored pencils, markers, or other media (for adding images and color)
- colored tape or ribbon
Hint: If you want to have images or poems on the front of your fan, draw the images or write out the poem on the paper before you start folding.
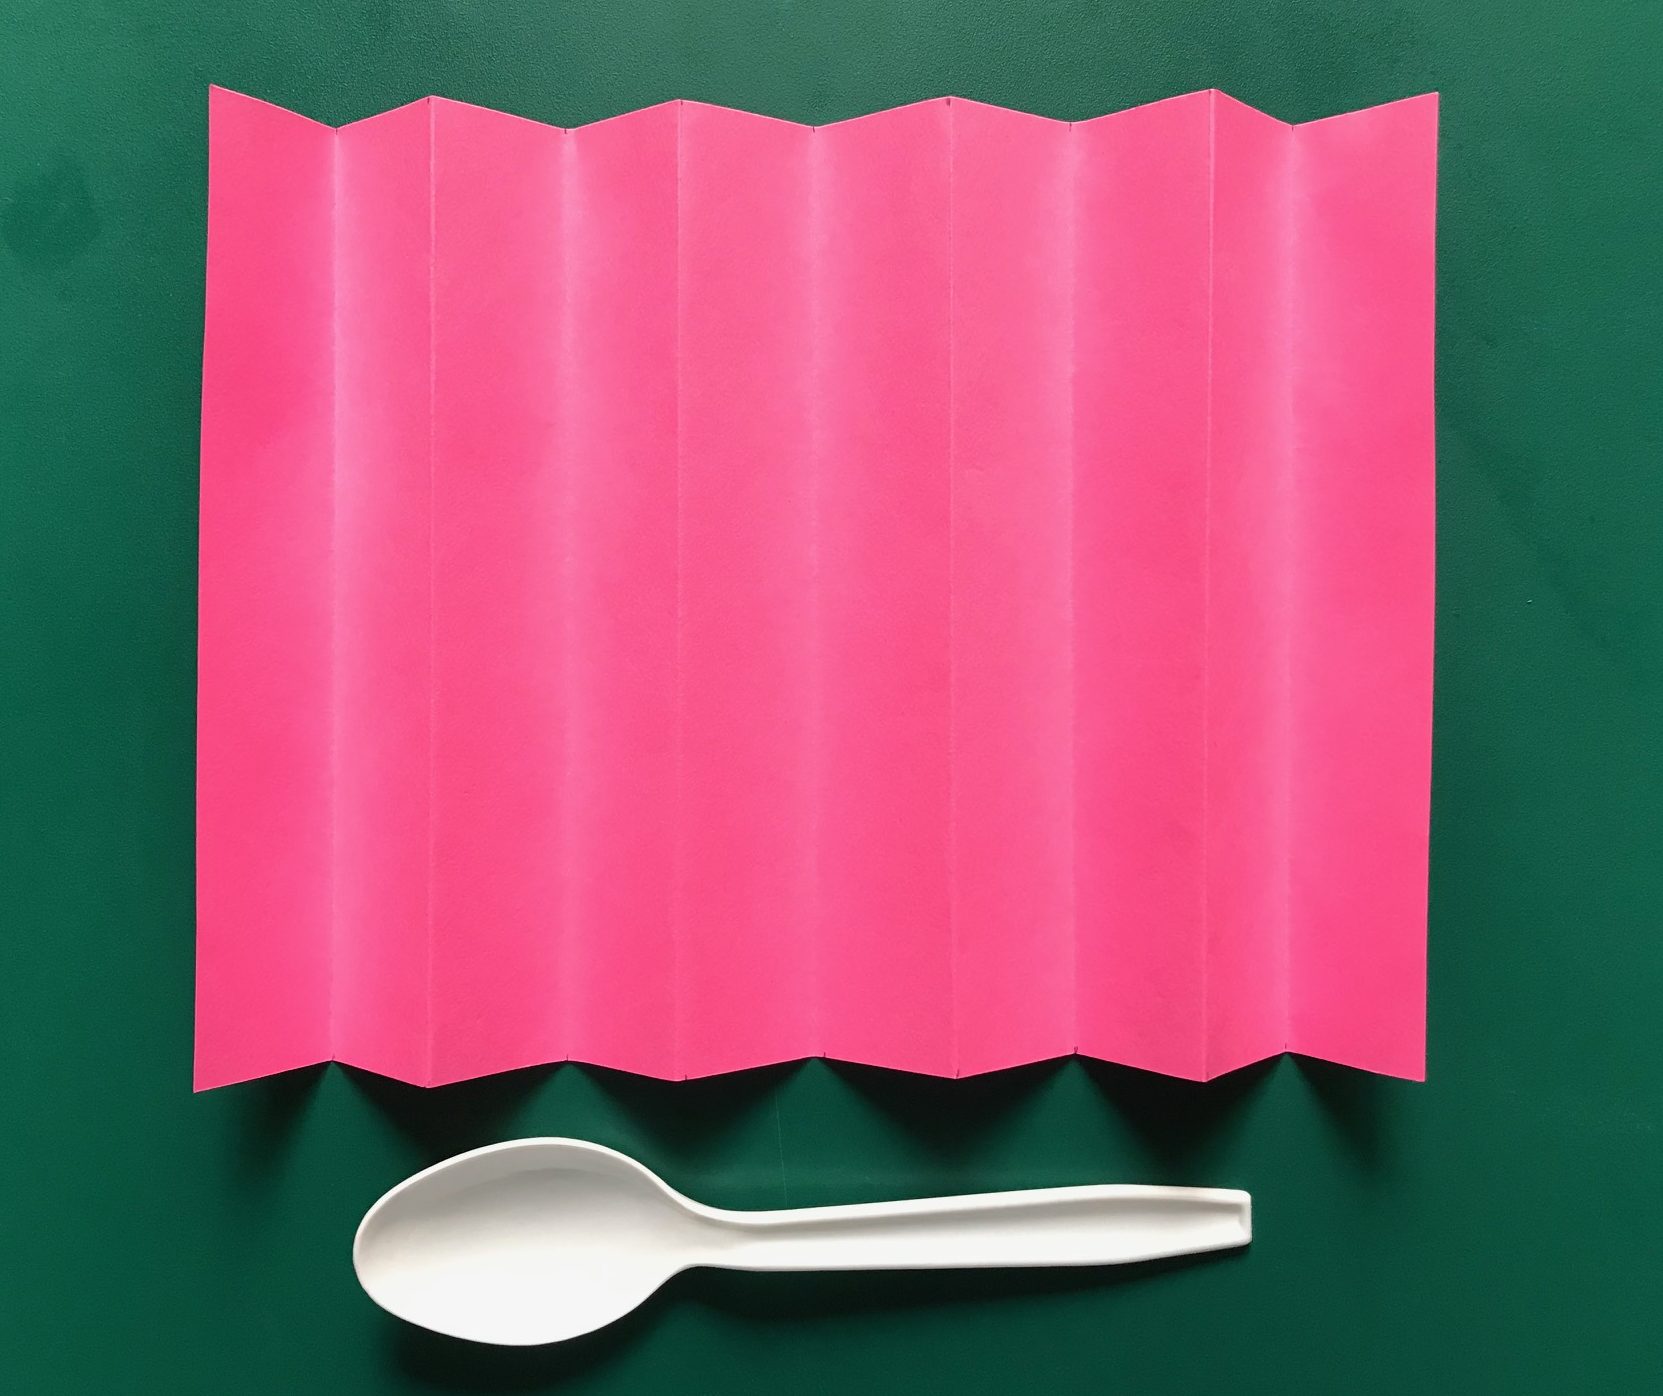
Let’s make some folds!
There are a number of ways to make a folded fan. Choose one of the following techniques to make your fan. (A technique is a way of doing something.)
Technique 1
Start at one end and fold up a small flap that is one inch wide. (Use your ruler to make a little pencil marks at the top and bottom of your sheet to make sure the flaps are one inch wide.)
Go to the other end of your sheet and fold up another one-inch flap. Keep folding, first at one end and then at the other you have made 10 flaps and 9 creases. Go slowly and try to keep your folds straight and the sections equal.
It may help to press down on each fold to strengthen the crease. (A plastic spoon or knife will work well for this step.)
If you picked Technique 1 to make your fan, go to the Finished Folding? Make a Handle! section to finish your creation.
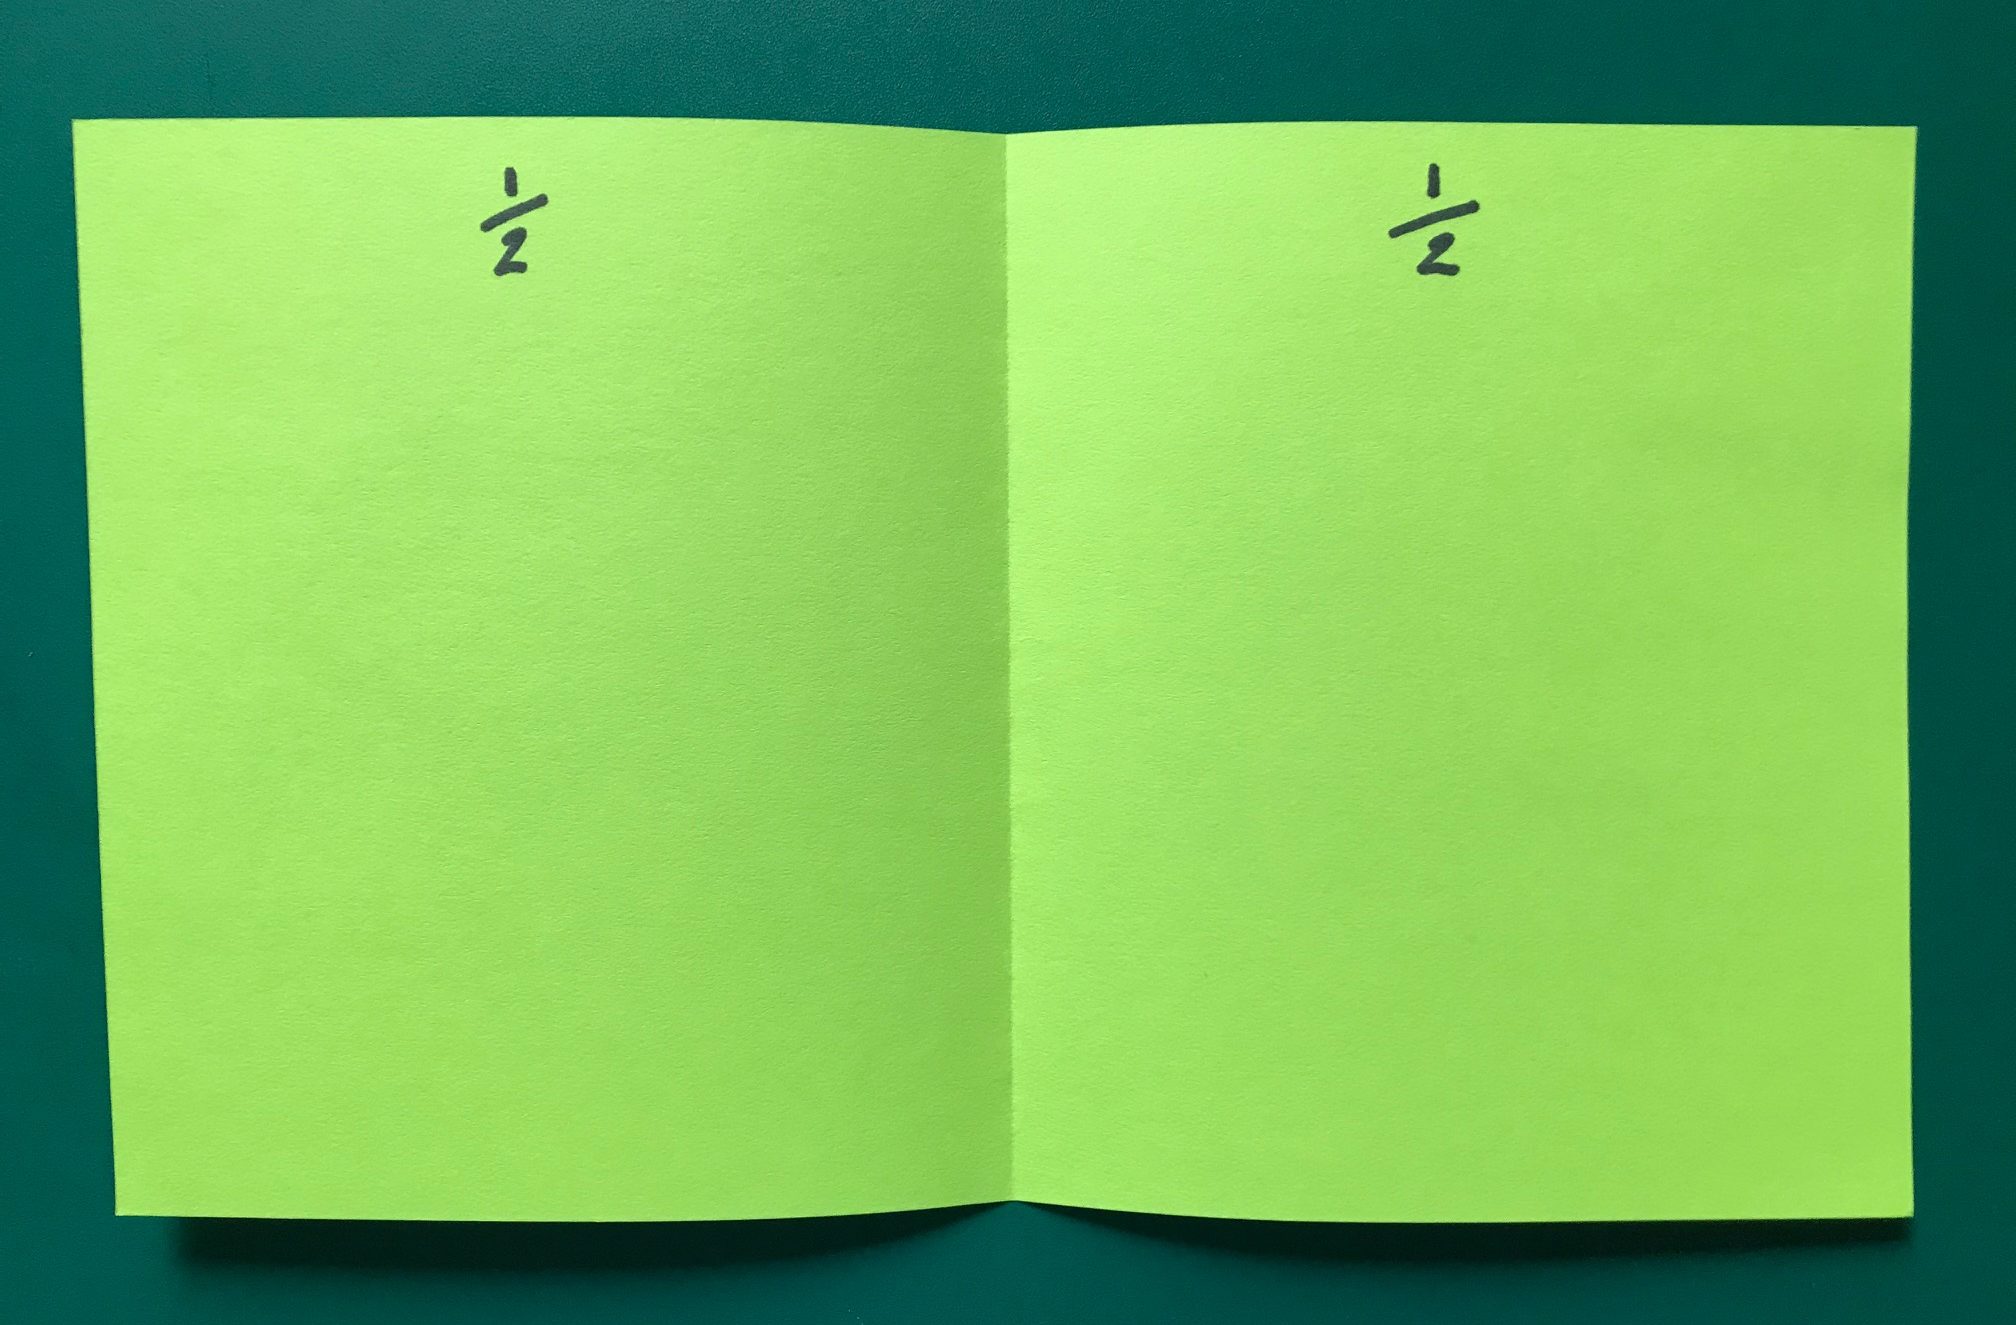
Technique 2
Fold the 6“ x 10”rectangular paper in half using a hamburger fold.
Math Connection: This technique offers opportunities to explore fractions in a hands-on and visual way. The first fold produces two halves. Use your ruler to measure the width of each side. (You should find that there are 5 inches on each side of the fold.)
Next, fold each side so that they meet in the middle at your first fold. These two folds will make 4 flaps. Each fold is ¼ of the length. Use your ruler to measure each flap. (You should find that each flap is 2 ½ inches wide.)
Keep folding the flaps in half first in one direction and then in the other so that they line up with the folds (or creases) you’ve made. Pressing down on the folds with a plastic spoon will make your folds neat and clean.
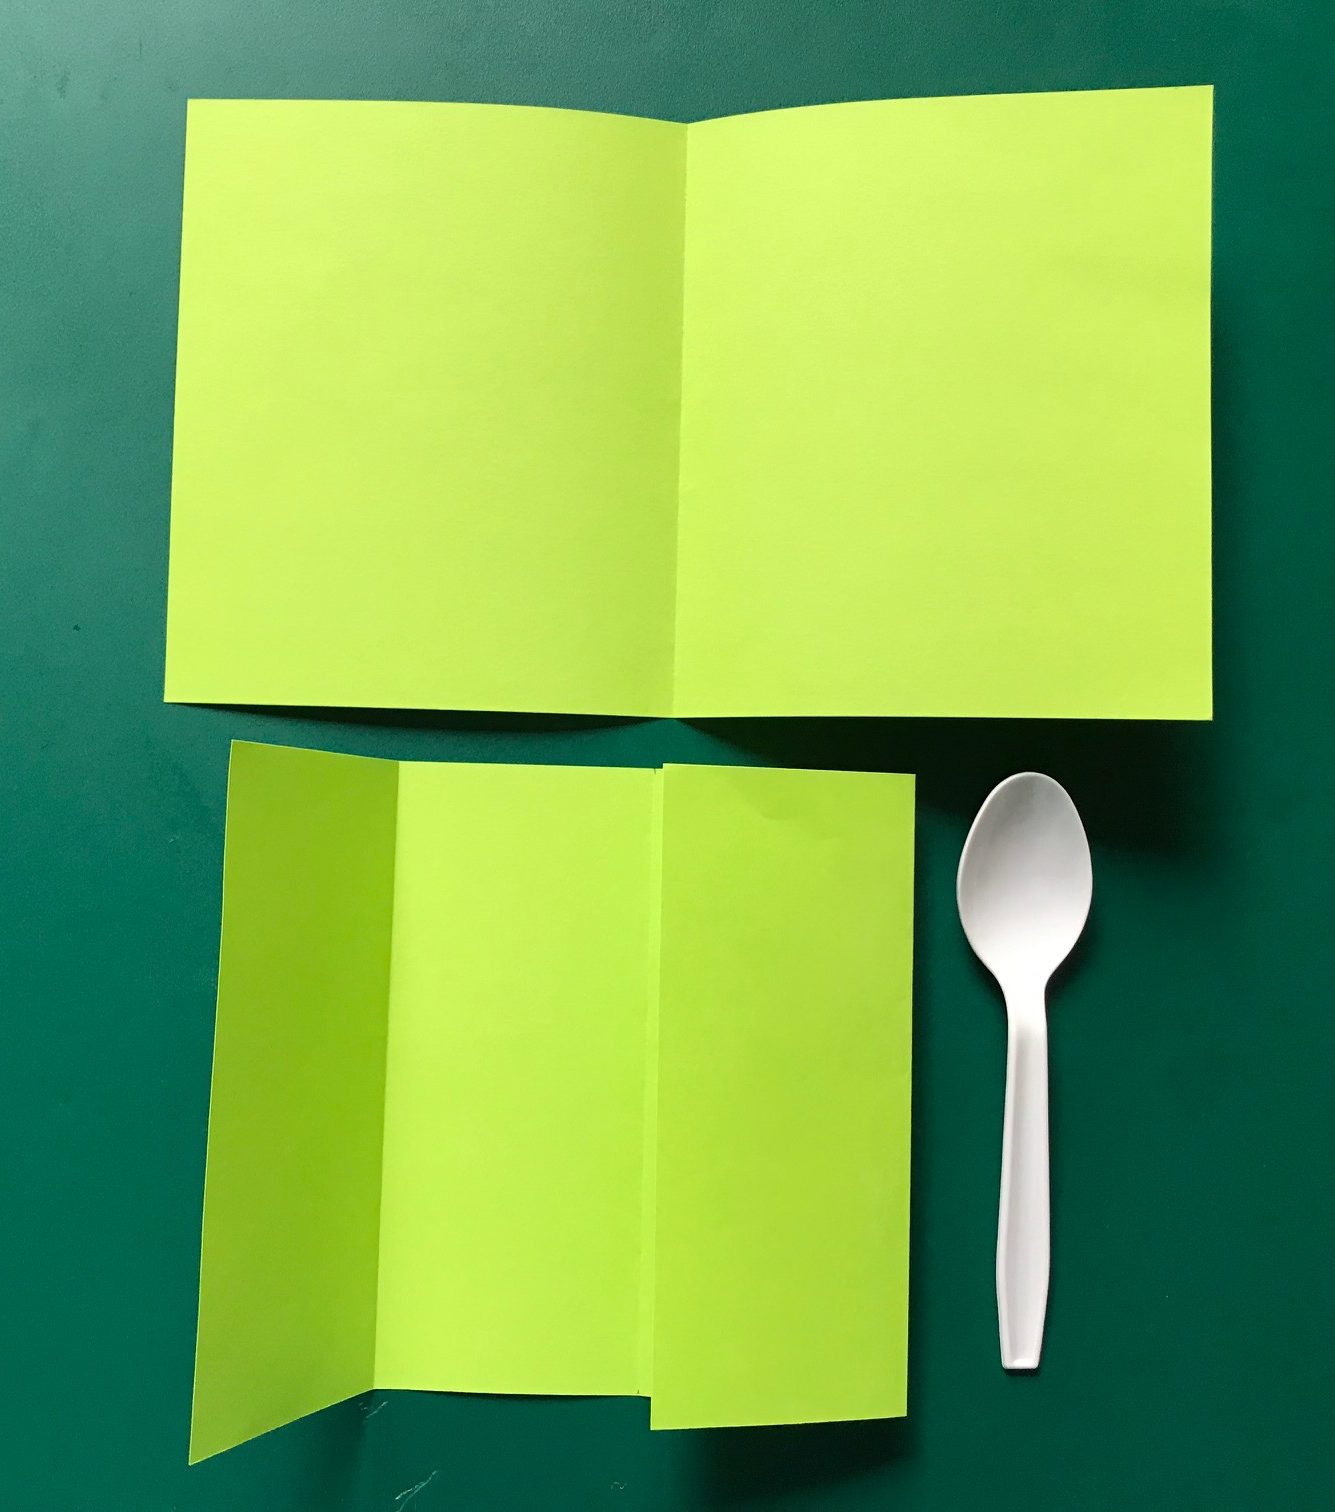
Fold each of the outside flaps in half, keeping the fold facing the center.
Then, make the final fold by flipping your fan over and folding the outside flaps in towards the middle.
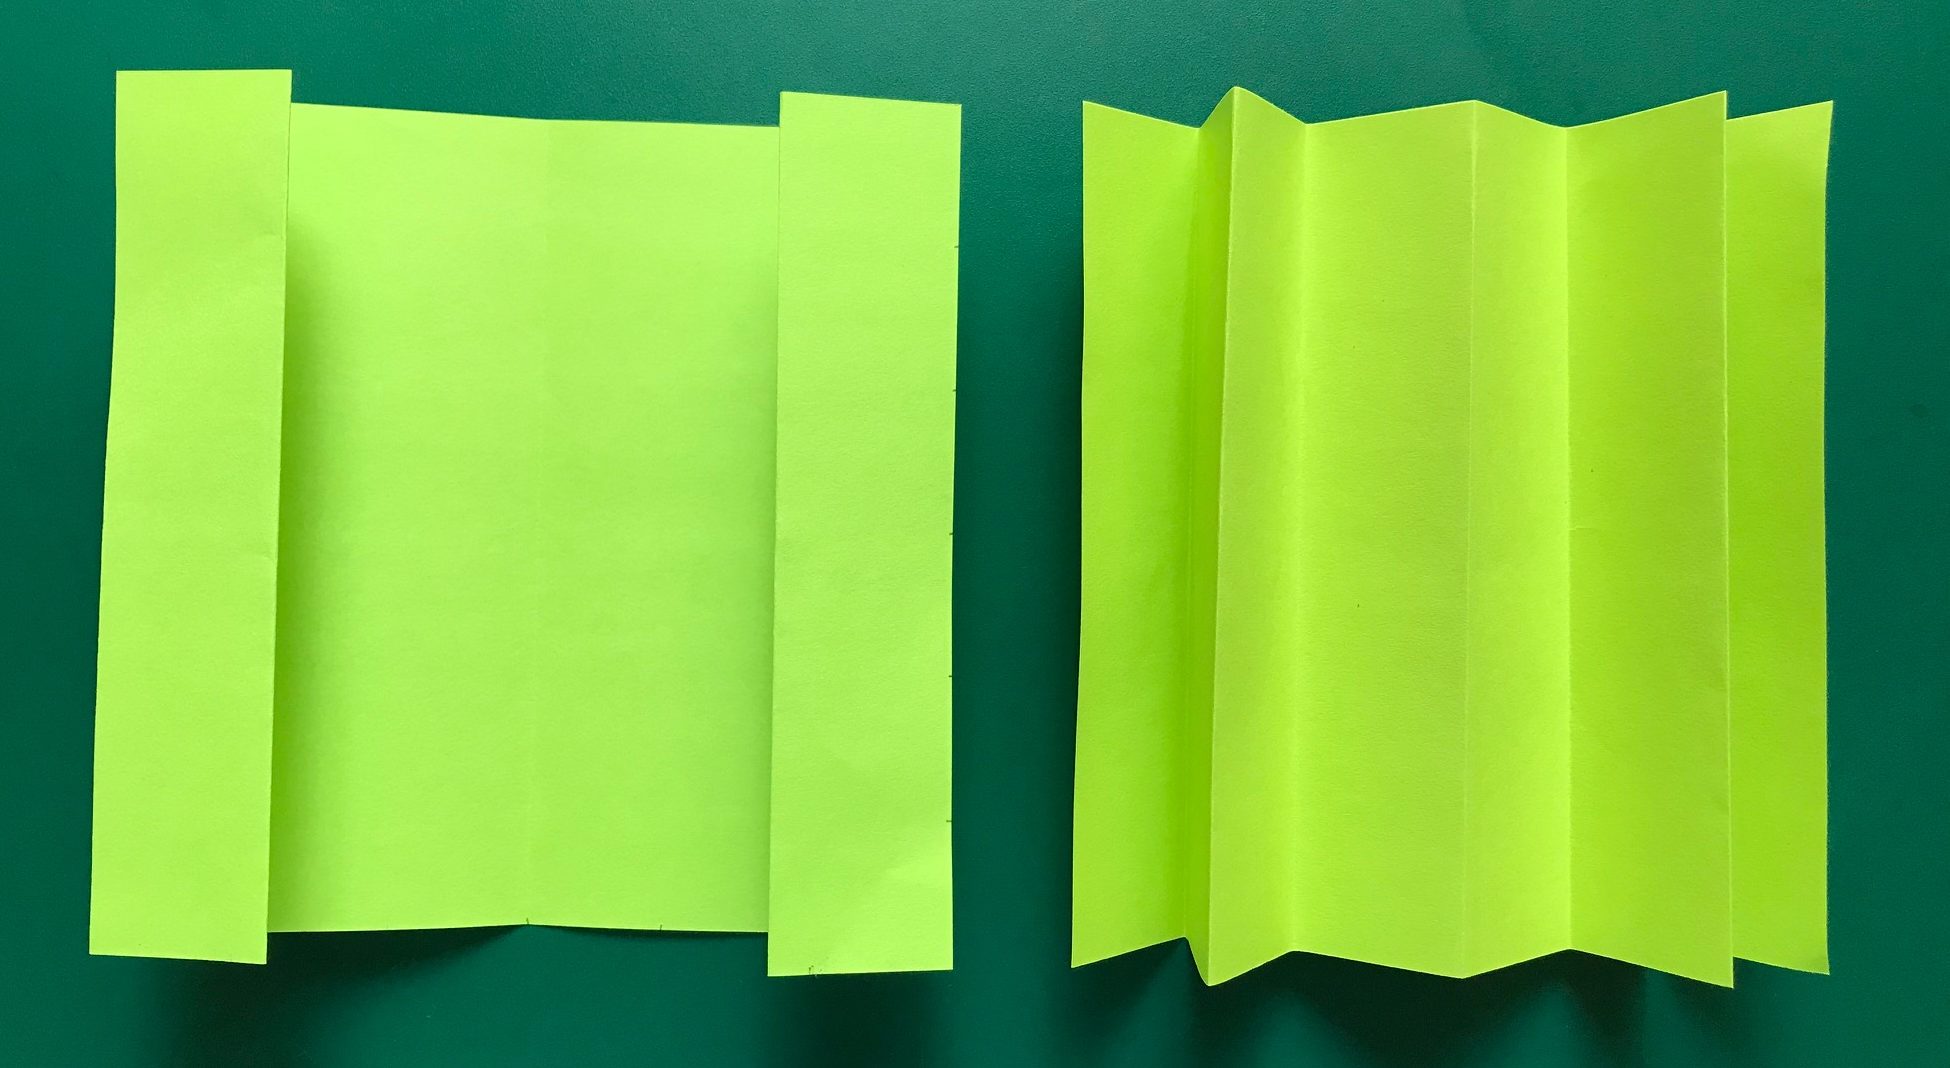
How many flaps do you have now? How many folds? (You should count 8 flaps and 7 folds.)
Use your ruler to measure each flap.
(You should find that each flap is 1 ¼ inches wide.)
Math Challenge: Did you notice that with each set of folds, you doubled the number of flaps? First, you created 2 halves, then 4 quarters, then 8 eighths.
Can you predict how many folds you would have if you folded each section in half once again? (Folding each flap in half again will produce 16 flaps and 15 folds.)
If you picked Technique 2 to make your fan, go to the Finished Folding? Make a Handle! section to finish your creation.
Technique 3
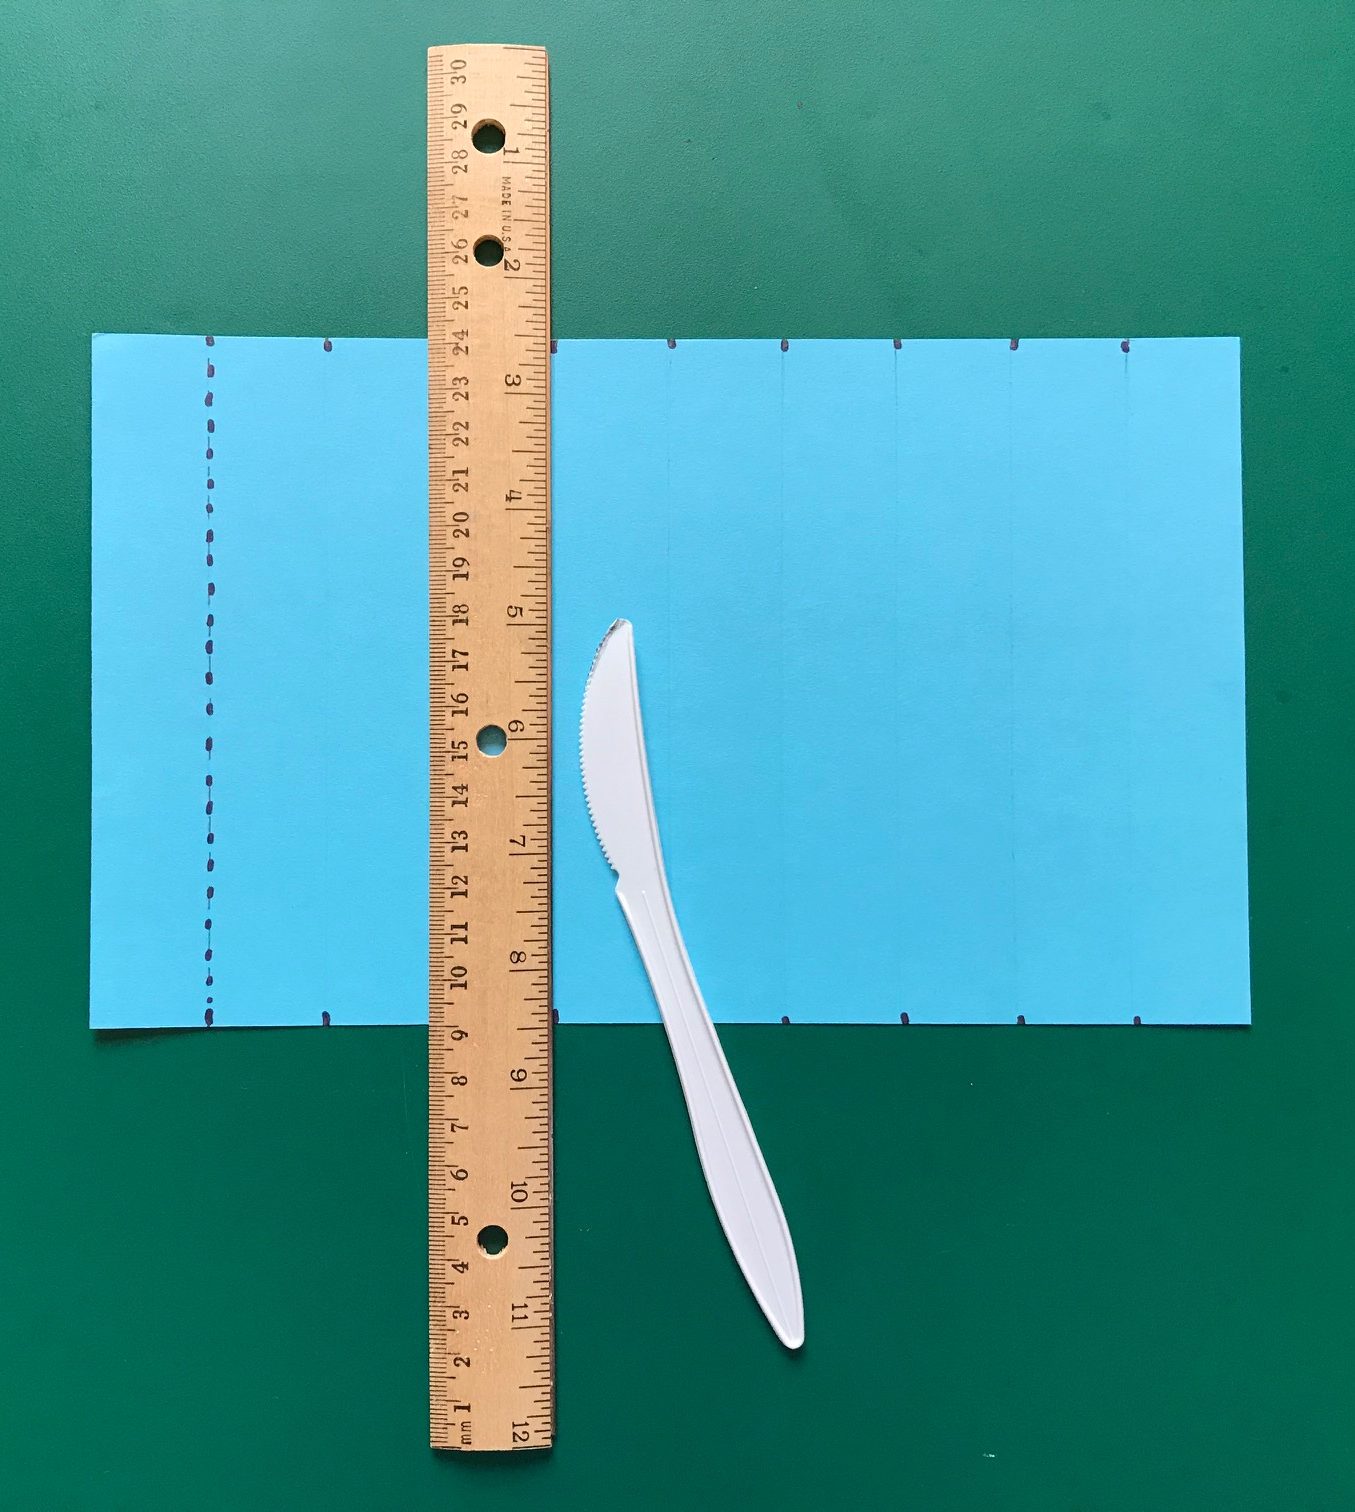
Carefully mark off equal intervals of one inch each on both of the long sides of your paper. Then line up the ruler’s edge with each set of marks (one mark at the top and the other at the bottom).
Use a plastic picnic knife to “score” the paper where you plan to fold it.
(Scoring means pressing a crease line into the paper to make it easier to fold the flaps.)
Once your scores are made, fold the flaps, first in one direction and then in the other until you finish folding all the creases you scored.
If you picked Technique 3 to make your fan, go to the Finished Folding? Make a Handle! section to finish your creation.
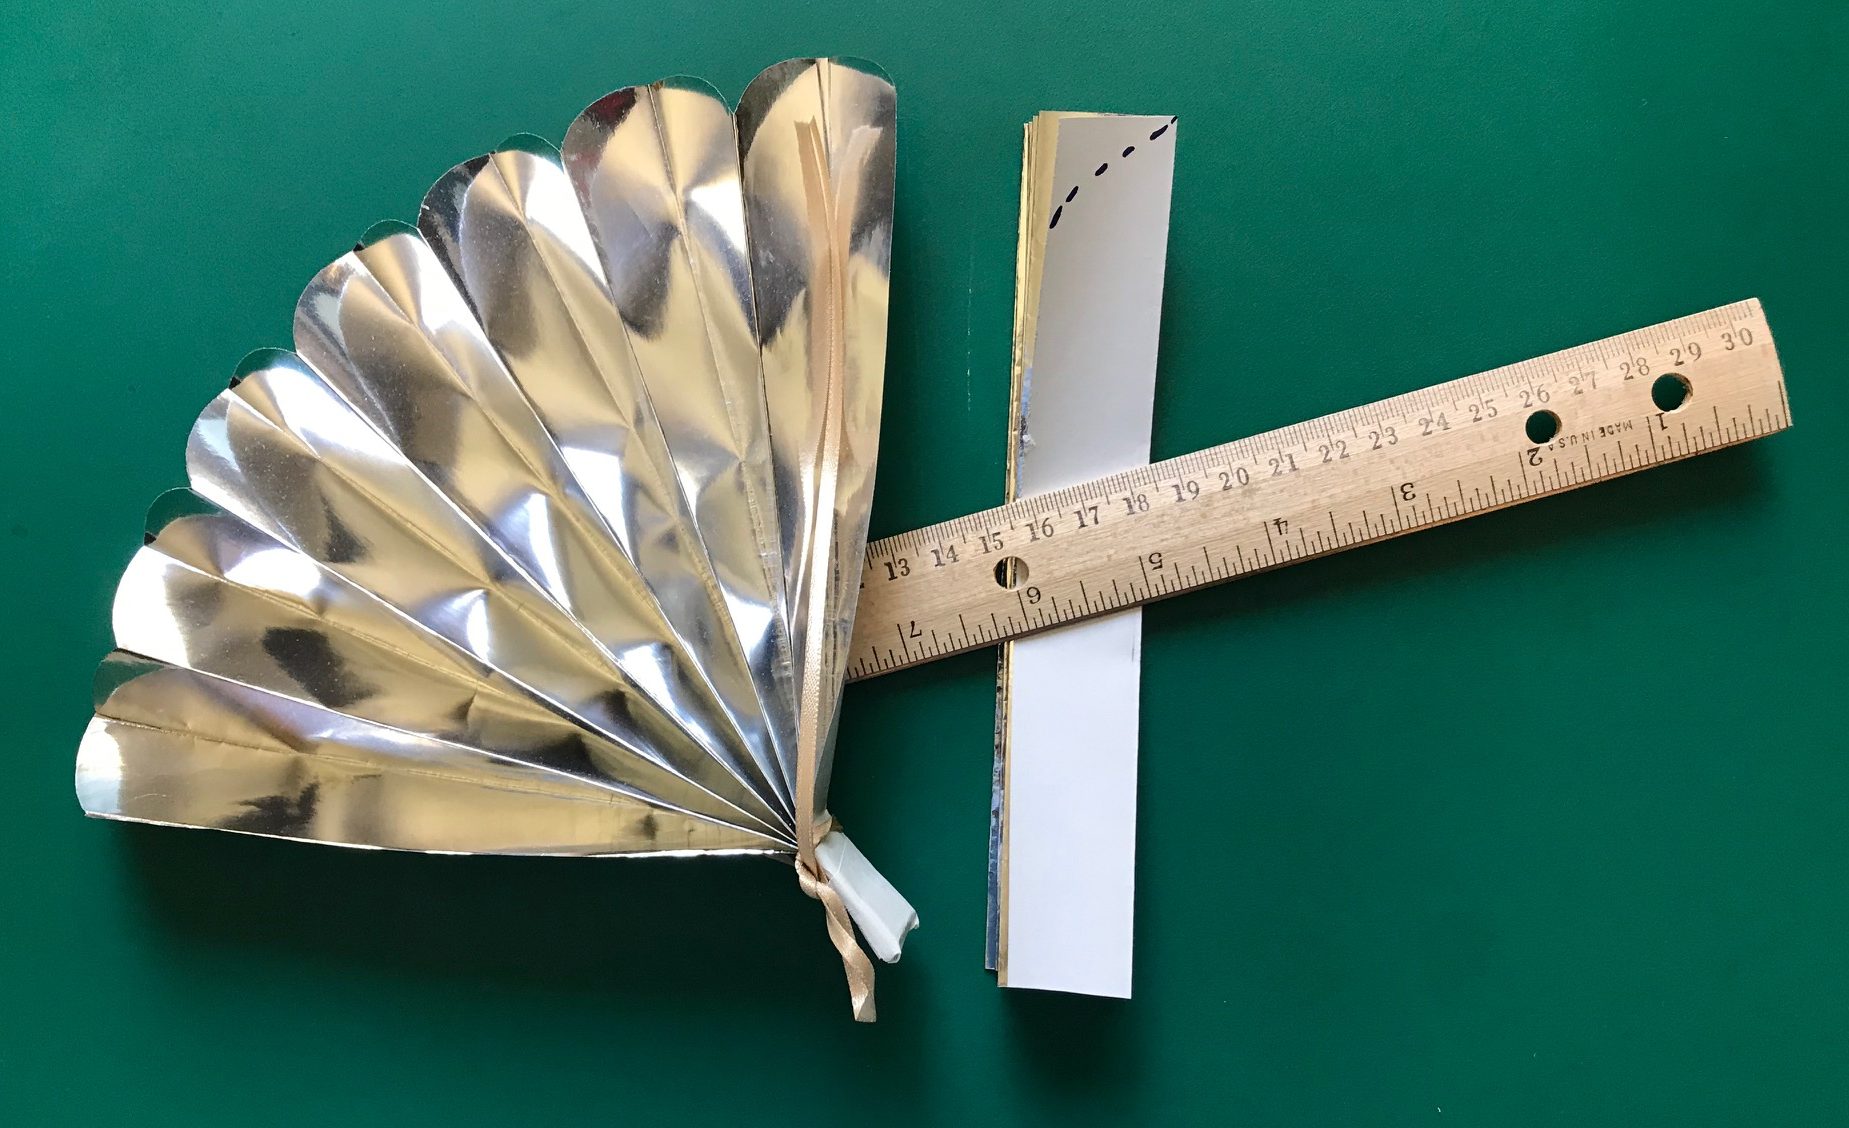
Finished Folding? Make a Handle!
When your paper is all folded up, make a crease about a half inch from the bottom of the fan. Wrap a piece of colored tape or tie a ribbon around the crease so that your handle is fixed in place.
You can add a scallop design at the top of your fan by cutting a small curve at the top of your folded fan about a half inch from the top.
You can also cut small diamond shapes into the sides of the folded fan—just be sure not to cut all the way across the flap.
Spread out your fan and enjoy your creation.
Keep on experimenting with different sizes, colors, and decorations!

Sensul: An Ethiopian Folding Devotional Book
The object below is called a sensul, or “chain of paintings.” It unfolds like an accordion (or a folding fan). The paintings in the chain show figures that were important to early Christians in present-day Ethiopia, an African country in which the Christian faith dates back many centuries. Early Ethiopian Christian churches were decorated with colorful murals—and illuminated religious manuscripts survive from the late 13th century (about 700 years ago). The earliest surviving examples of sensuls date to the late 15th and early 16th centuries (about 600 years ago). The structure of this folding manuscript makes it easy to hang over a bed at night for protection. It could also be folded up to carry in a pocket or tucked inside clothing during the day.
Experts believe that the first six panels of this sensul (from left to right) show pictures of the twelve apostles. The next three panels feature images of a Madonna and Child on either side of a scene with two archangels. Three panels showing holy men and Old Testament figures come next, and the final five panels present images of armed saints riding horses, ready to fight against evil.
You can learn more about Christian Ethiopian art in this Khan Academy article by Dr. Jacopo Gnisci.
Additional Source:
Nosnitsin, Denis. Ethiopian Manuscripts and Ethiopian Manuscript Studies. A brief Overview and Evaluation. Gazette du livre medieval, Année 2012, 58, pp. 1-16.
https://www.persee.fr/doc/galim_0753-5015_2012_num_58_1_1993 (accessed 4-3-2020).
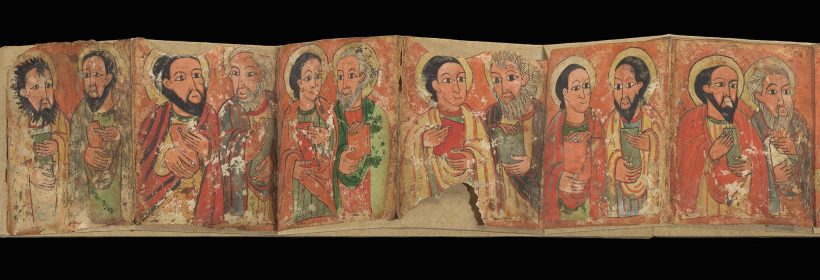
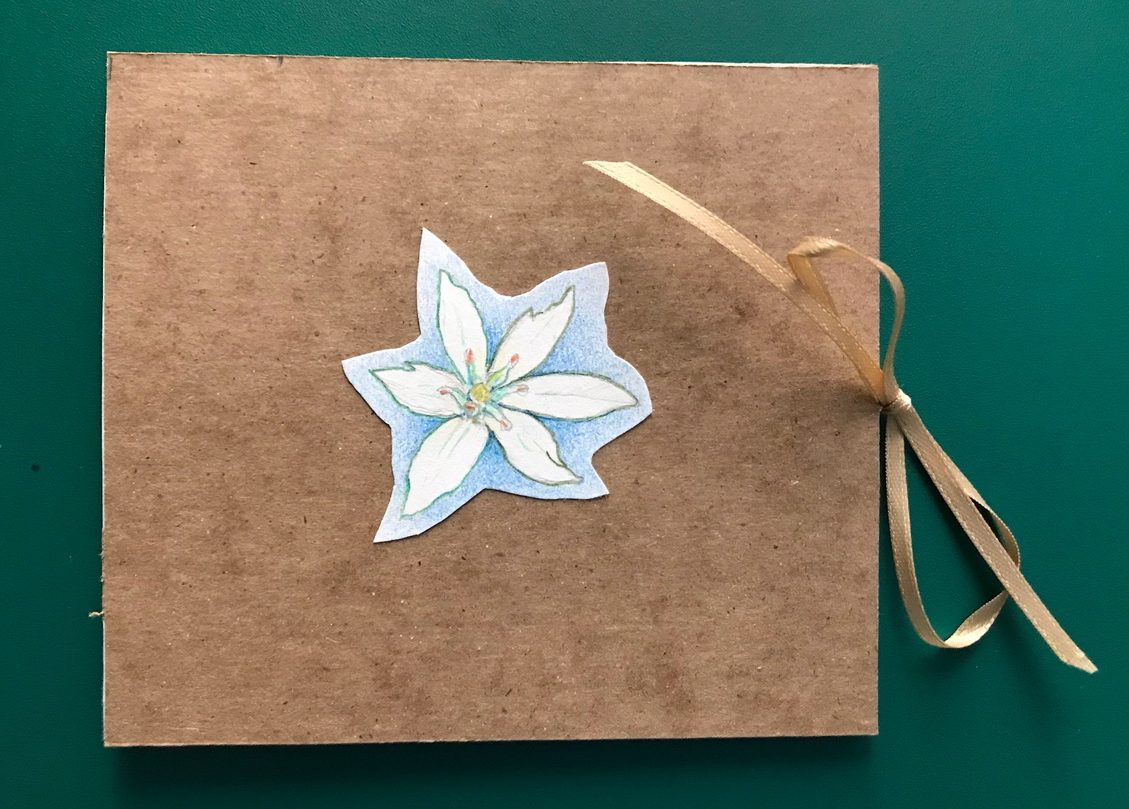
Sensul with Images of Saints, 15th century, Ethiopian, Tempera and ink on parchment, Gift of Robert and Nancy Nooter, 2012.301
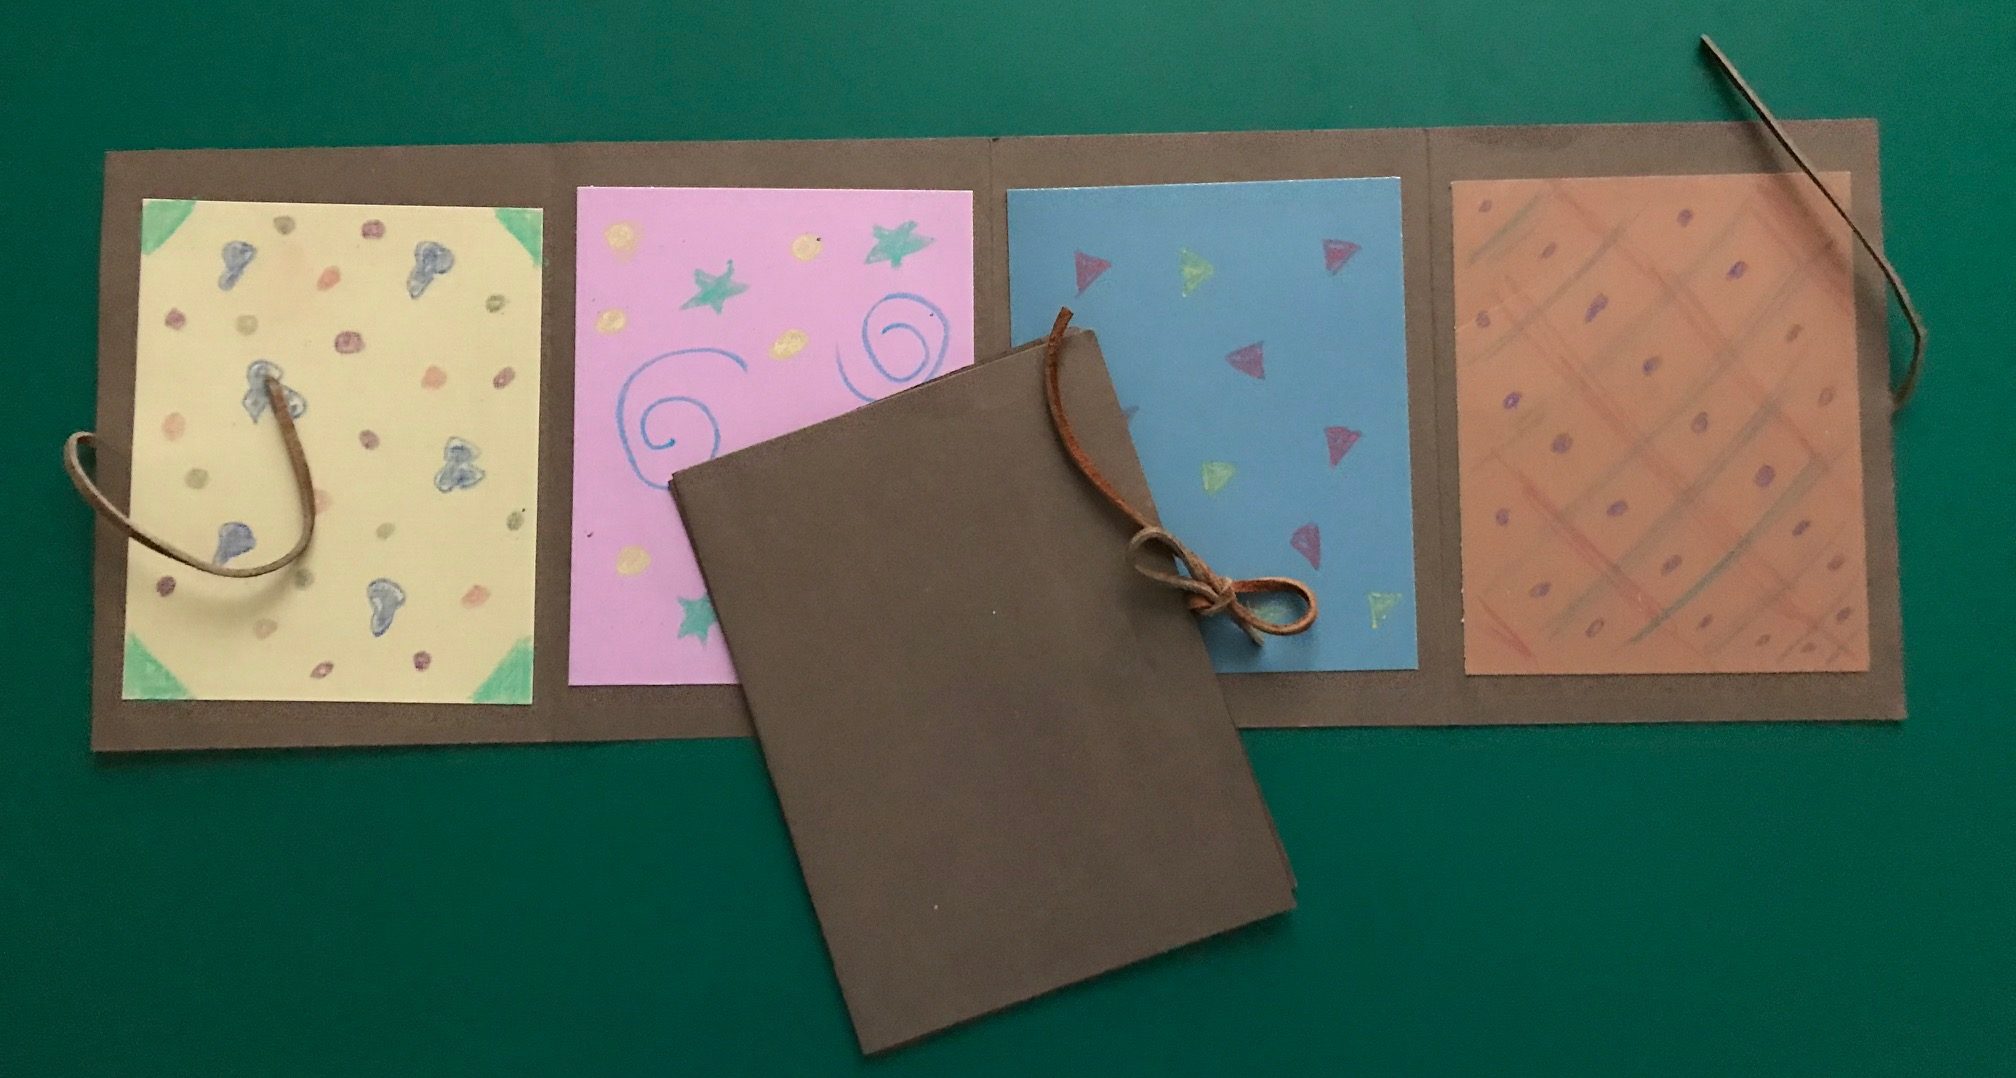
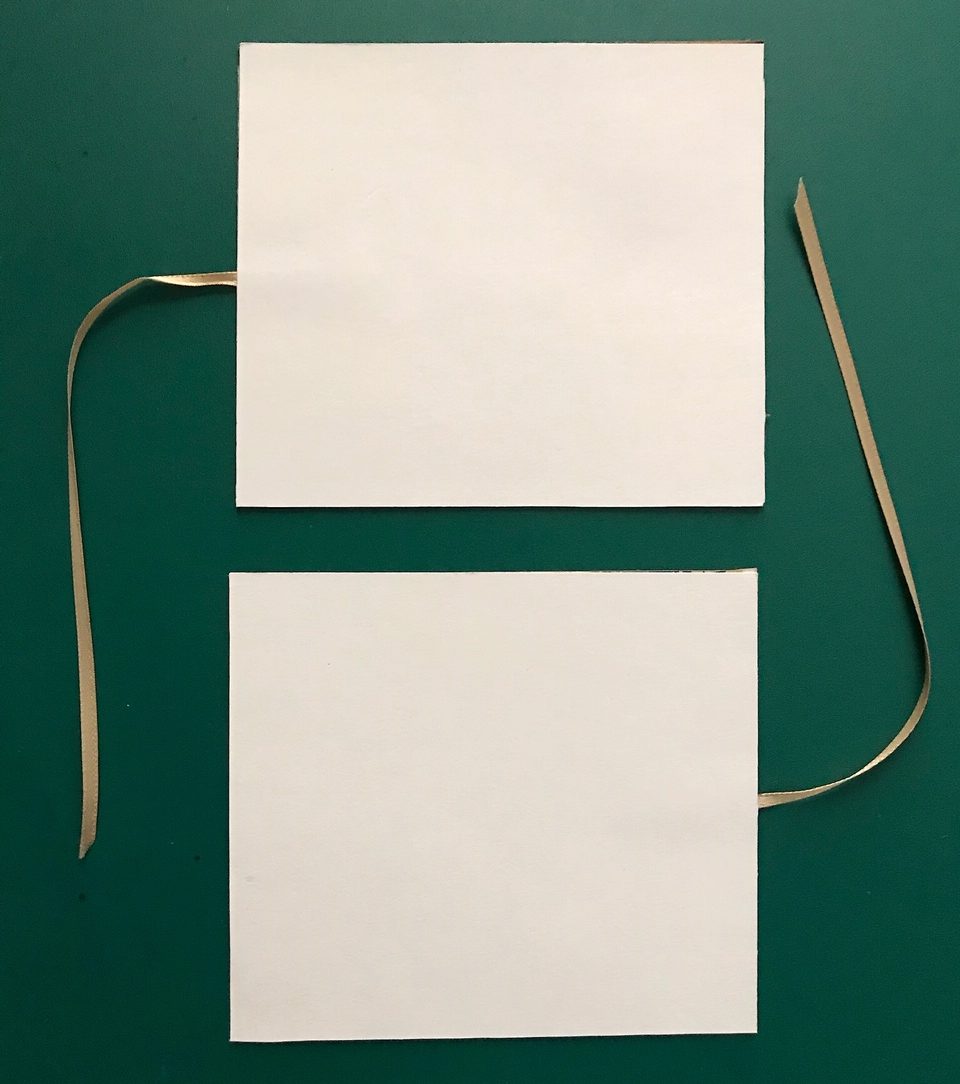
Make Your Own Folding Chain Book!
Easy Version
You’ll need:
- 6” x 18” brown paper, folded accordion-style into four 4 ½-inch panels (1 per sensul)
- 4” x 5” pieces of drawing paper (4-6 per sensul)
- ribbon or cord, cut into 7-inch lengths
- glue sticks
- crayons, markers, and/or colored pencils
What’s in Your Manuscript?
Select 4 small squares of paper and create pictures to illustrate a favorite story, a poem, or something that inspires you. Think about how the pictures link together to tell a story. Try adding words or captions to your illustrations.
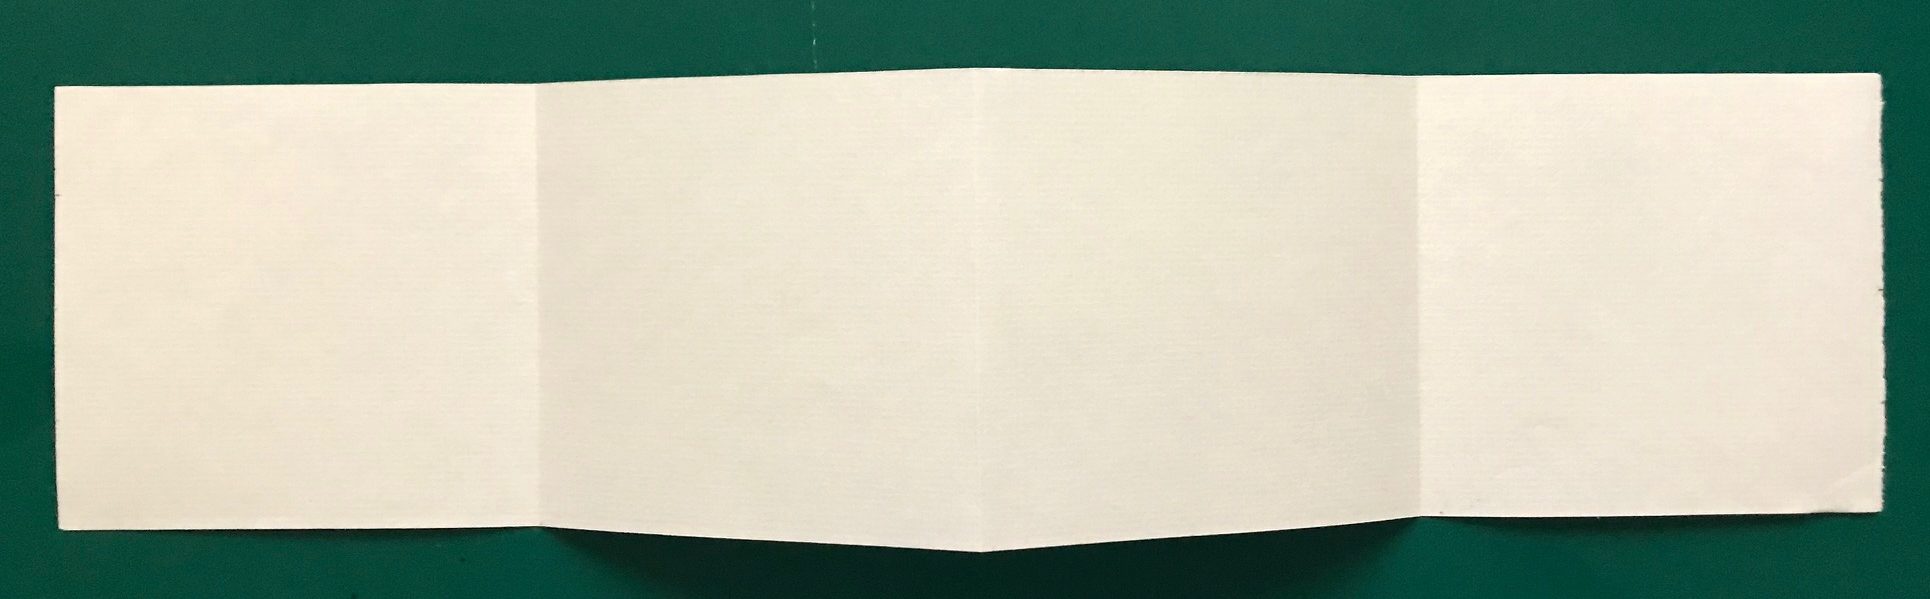
Once you have finished your picture squares, unfold one piece of the folded brown paper and place it on your work table. Lay out your four picture squares in the right order for your story. Pick two ribbons or cords and put them where you can easily reach them.
Glue the two center pictures down on the two middle panels of your brown paper. Before you glue down your picture on the first panel, place the end of one of the ribbons or cords in the center of the panel so that you will trap about an inch of it between picture and panel. Then, glue the picture in place. Repeat the process for the last panel. If you like, create two more pictures to glue to the front and back of your folding book. Be sure to let the glue dry before you tie a bow with the ribbons or cords to close and protect your sensul.
Advanced Version
You’ll need:
- cardboard rectangles (Thin cardboard works best.)
(4 ½” x 4” is the size of the example used below, although any size will work as long as the height matches the paper sheets.) - paper rectangles, slightly larger than the cardboard rectangles
- a long piece of drawing paper for the folded pages of your sensul
(4” in height for each long sheet works well, but as long as the height matches the cardboard rectangles, any height will do. If your cardboard rectangles are 4 ½” wide, the sheets of paper need to be at least 17” long to produce 4 panels. You can glue strips together to make longer chains.)
- ruler
- two 7-inch strips of ribbon, string, or yarn
- glue stick
- pencil, colored pencil or markers
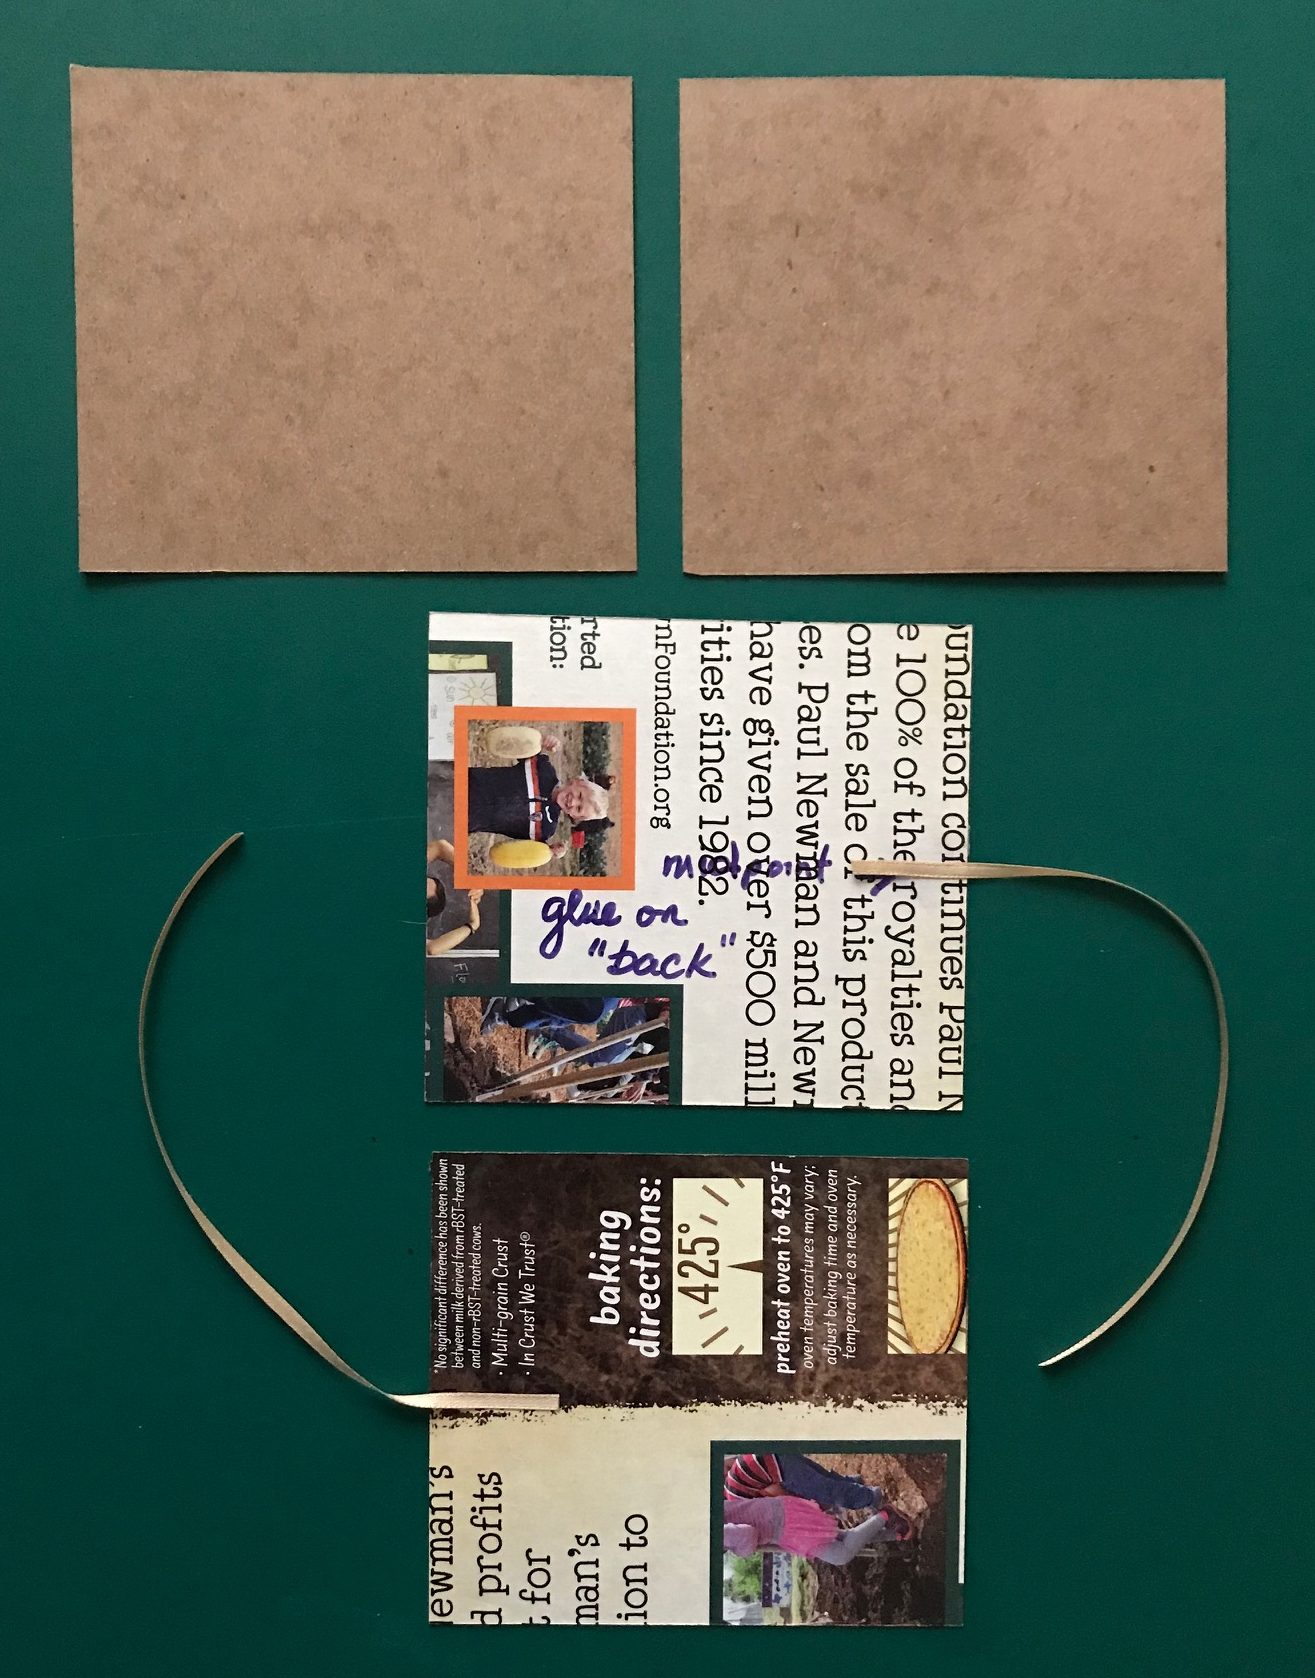
Make the front and back covers:
Begin with the cardboard rectangles. (Recycle those materials! The rectangles for this example were cut from a frozen pizza box.)
Mark the center points of the short sides of the cardboard rectangles. Cover the “back” side of the rectangles with glue using the glue stick. Position one piece of ribbon (or string or yarn) so that one inch is on the gluey surface. Leave the rest of each ribbon hanging loose.
Be sure that the ribbons are on opposite sides of the rectangles so that they will match up correctly when the sensul is folded up.
Place the glue side of the cardboard square on the paper rectangle so that it fits within the larger paper rectangle. The inch of the ribbon on the glued sheet should be caught between the cardboard rectangle and the paper.
Line up the edge of the paper with the edge with the ribbon to make it easier to trim the edges of your sensul.

Once the glue is dry, trim the extra paper so that the paper and cardboard are the same size. You have made the front and back covers for your sensul!
Once you have finished the inside pages of your chain manuscript, you will make a bow with the ribbons to protect your little folding book.
Prepare the Pages: Fold the long sheets of paper so that each section is just a little bit shorter than the front and back covers (4 ¼” works well for 4 ½” wide covers.)
Be sure to measure each section carefully.
You should have at least 4 equal sections for your drawings.
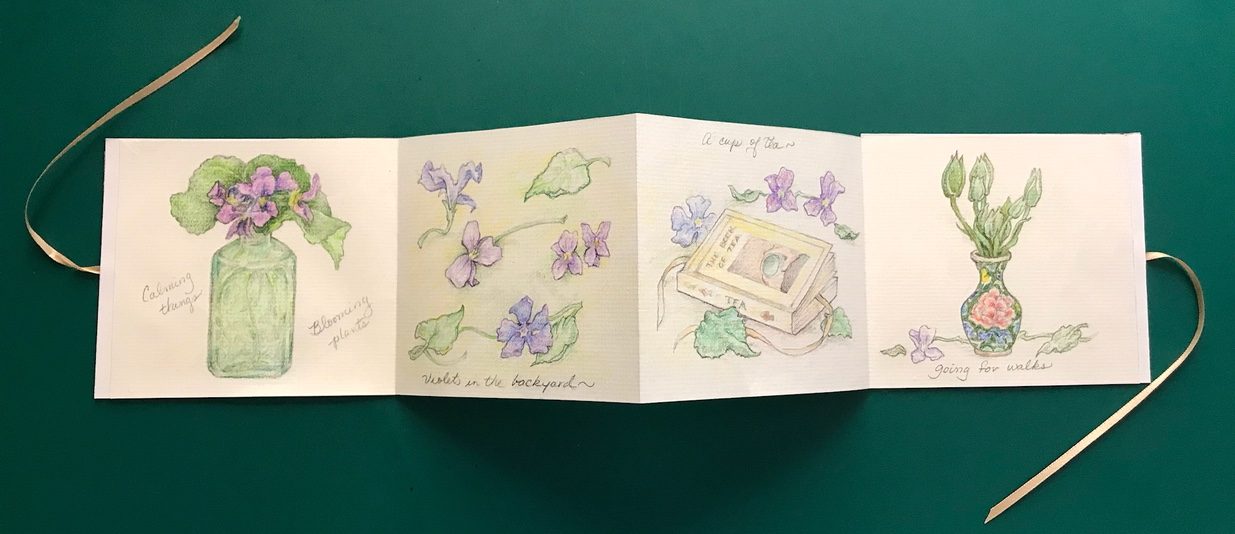
Illustrate Your Chain Manuscript!
Once you have the paper neatly folded, draw or decorate your folding book. Try developing a theme or story that you find inspiring. Think about the visual story you want to tell as you plan your images. Add captions, poems, or quotations to help explain the meaning of your images.
Once you have finished your illustrations, glue the back of the first section of the story to the back (paper side) of your cardboard cover. (Make sure that the ribbon will be on the right of the book once it is folded up.) Finally glue the last section of your story to the back cover. (Make sure this ribbon will also be on the right side of the book when it is folded up.) Make a bow with the ribbons and your sensul (or chained manuscript) is ready to travel!
Parfleche Bags: Decorated Native American Containers
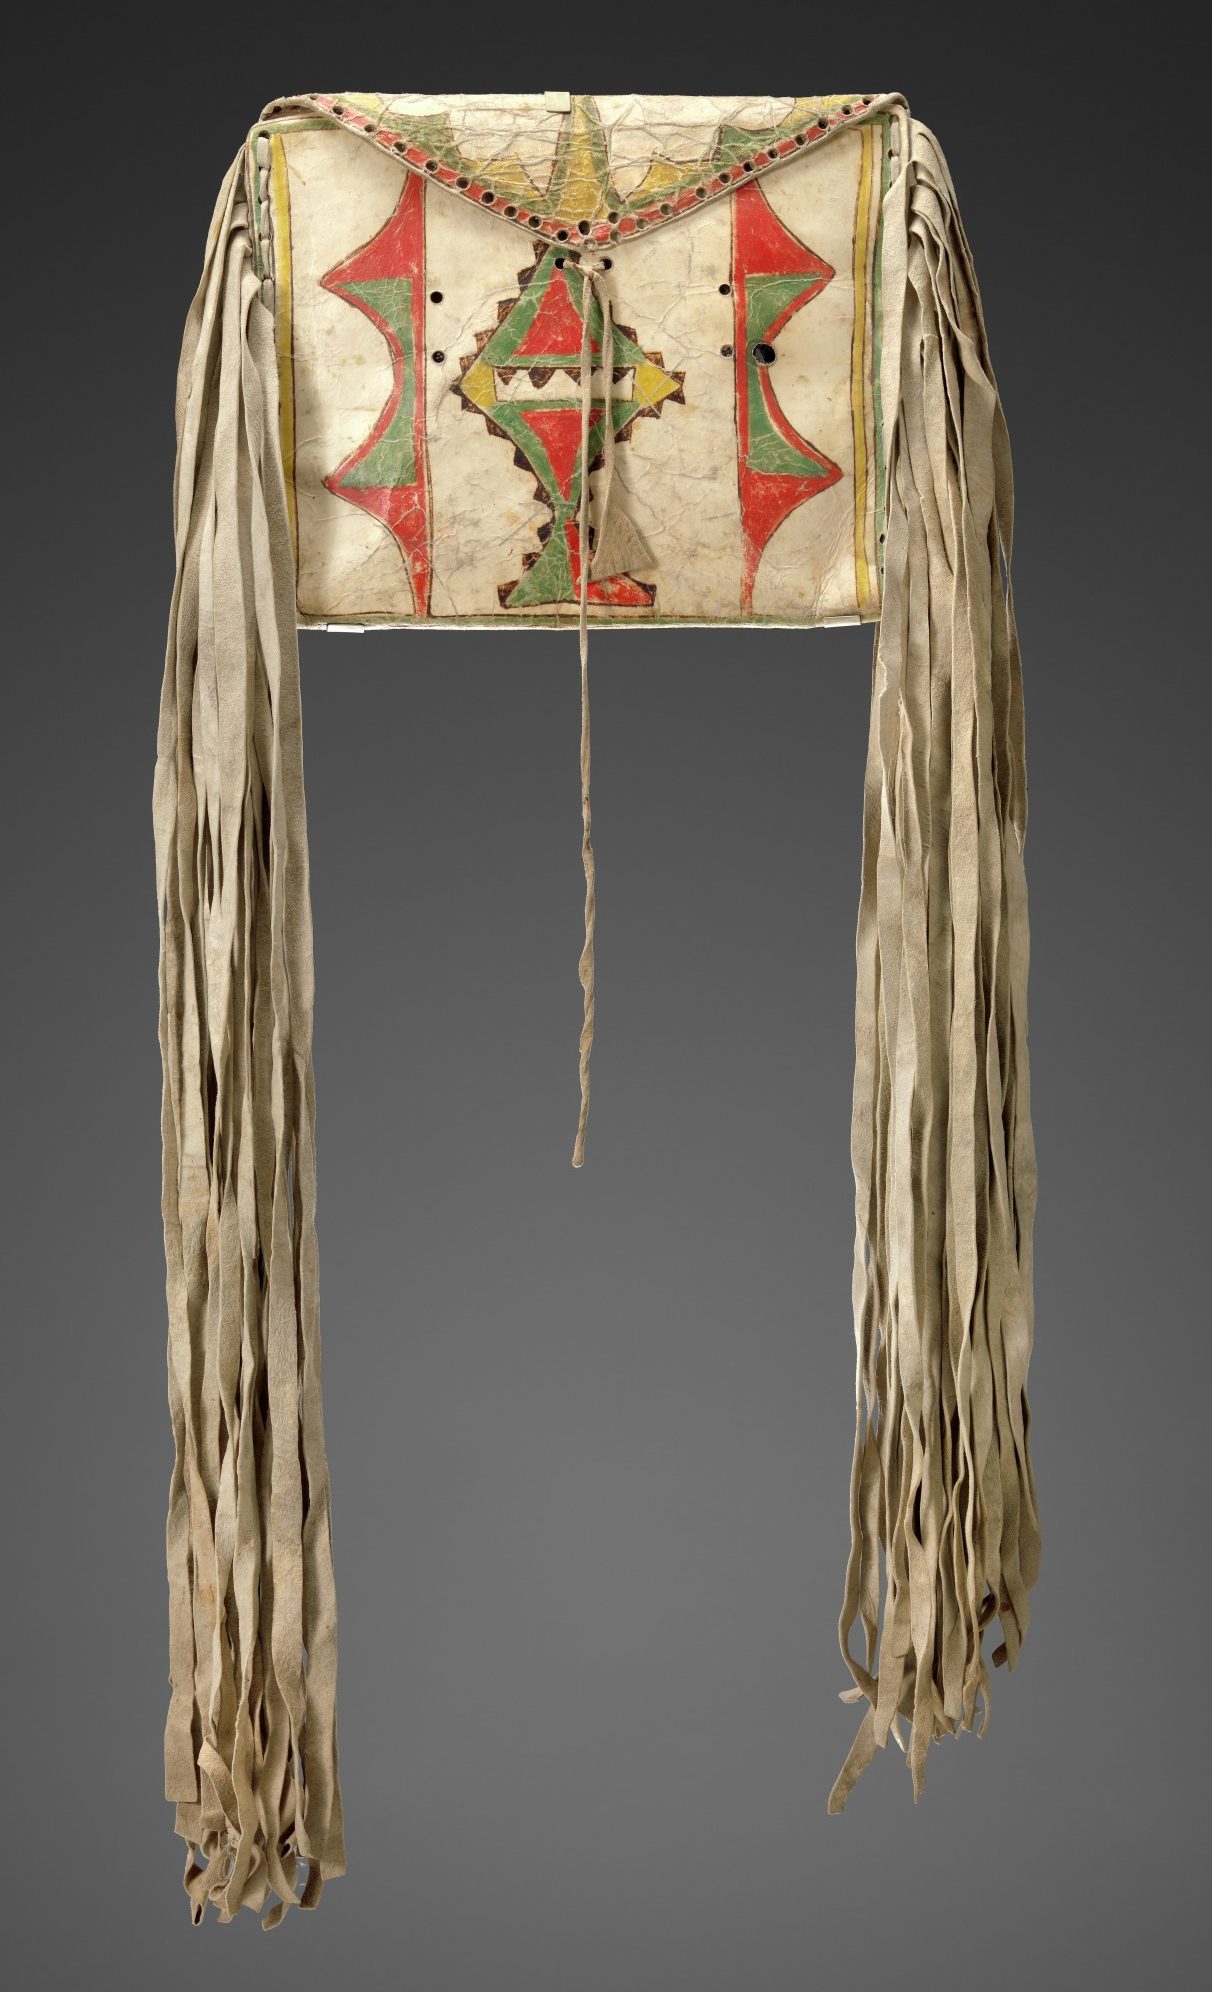
Many examples of parfleche bags made by various Native American peoples can be found in museums today.
Made of rawhide, these containers were colorfully decorated with different shapes and patterns that had meaning for specific groups of Plains and Northwest Coast Indians.
The geometric designs that were used to decorate these containers continue to inspire contemporary Native American artists.
The term parfleche actually comes from French words for “turning away arrows” because the prepared hides were so tough and strong.
These bags were traditionally made by women, using long pieces of wet or damp rawhide. First, the sides of the rawhide rectangle were folded so that they met in the middle of the rectangle. Then, the ends were also folded to meet in the middle, creating a secure pouch within the container. Many different sizes could be made using this technique. Once the rawhide dried out, the containers (or pouches) held their shapes quite well. To finish their containers, the makers decorated the surfaces of the bags with brightly colored paint and added leather ties or fasteners—and the parfleches were ready to use.
This particular flat-case parfleche, made by the Yakama people who live in Central Washington State, is a variation of the usual design. Notice how the upper flap has been trimmed into a triangle shape? The fringes also add visual interest to this parfleche.
Make a Parfleche-Inspired Container of Your Own
Easy Version
A VMFA Make and Take activity, which provides instructions and a printable template for making a small parfleche–inspired container from a single sheet of 8 ½ “ x 11” paper can be found here: https://www.vmfa.museum/learn/resources/take-make-parfleche-bag/
Advanced Version
Use the same basic process, but make a larger parfleche-inspired container using a larger piece of strong flexible paper or other material, such as unbleached muslin.
(Paint the front of your unbleached muslin parfleche with watered down glue and let it dry before painting on the decorations.)
Make the Social Studies Connection: Do some research about parfleche bags.
Keep a record of the sites you visit and explain why you think the sites you choose are trustworthy!
Here are some suggestions for museums to investigate that have parfleche bags in their collections—along with a PBS YouTube video:
- Denver Art Museum
- Brooklyn Museum
- British Museum
- Wyoming PBS YouTube video: Shoshone Parfleche – Lived History, the Wind River Virtual Museum
Which designs do you like best? Can you combine and change the designs you like best for the decorations on the front of your own parfleche-inspired bag?
This VMFA Art-Making Adventure relates to the following Virginia SOLs:
2020 Visual Arts Standards: K.1, K.2, K.7, K.8, K.9, K.13, K.15, K.16, 1.1, 1.2, 1.12e, 1.15, 1.16, 2.2, 2.6, 2.8, 2.12, 2.15, 2.16, 2.17, 3.6bcd, 3.7, 3.11, 3.12e, 3.17, 4.6ad, 4.8, 4.12d, 4.17, 5.6abc, 5.12f, 5.15, 5.1
2013 Visual Arts standards: K.1, K.3, K.5, K.9, K.11, K.13, 1.1, 1.4, 1.5, 1.12, 2.1, 2.4, 2.10, 2.12, 2.21, 3.2, 3.5, 3.11, 4.1, 4.2, 4.3, 4.11, 5.1, 5.2, 5.3, 5.5.3, 5.1
2016 Mathematics standards: K19, 1.4, 2.4bc, 2.8a, 2.12, 5.8
2017 English standards: K.1h, K.4b&c, K.5c, K.7c, K.11abc, 1.7e, 1.11, 1.2d, 2.9, 2.10e, 3.7, 3.8ad, 4.9abc, 5.9abc