Use the interactive map to explore the museum

Search for art, find what you are looking for in the museum and much more.
Museum Tours
Audio Description Tour: Design
Introduction
The elements of design, whether abstract or representational, have been used to create art through many cultures and centuries. Join us on this audio description tour of four works in VMFA’s permanent collection and explore how artists use line, shape and color to build their unique designs.
Introduction
Wall Drawing #541
Wall Drawing #541 – Sol LeWitt – 1987 (current installation made in 2009)
Dimensions vary at each installation
Acrylic ink wash applied to wall
Label Copy
A quote by Sol LeWitt – “When an artist uses a conceptual form of art, it means that all of the planning and decisions are made beforehand and the execution is a perfunctory affair. The idea becomes a machine that makes the art.”
In the mid-1960s, Sol LeWitt was a founder of Conceptual Art, an international movement that stressed idea over form. LeWitt regarded his “wall drawings” as akin to musical compositions that could be performed again and again. A museum or collector purchasing one received a certificate of ownership and a set of installation instructions.
The colors in this version come from layering transparent washes of red, yellow, blue, and gray directly on the wall rather than mixing them beforehand; LeWitt’s instructions specify the number of layers and the order in which to apply them. The cubes are isometric drawings (all opposite sides are parallel) that represent three-dimensional forms on two-dimensional surfaces. LeWitt crops some of the forms to create the illusion
This painting takes up four entire walls each measuring approximately sixteen by sixteen feet. It unapologetically draws focus from the expanse of the Marble Hall, which is at your back when viewing this piece, and boldly announces the transition into the 20th Century gallery. The four walls form an angular c-shape around you. One wall is on your left side, there are two in front of you, and there is one to your right. A walkway separates the left side wall from the left center wall, and a more formal walkway, introducing the 20th century gallery, splits the two center walls. The only walls that actually touch are the right center and right side wall. That all being said, the vivid starkness of each wall makes the doorways seem irrelevant as if hypnotizing you into believing there are no doors and no escape.
Each of the fours walls has a solid colored background and contains a giant cube that takes up nearly half of the pictorial space. Each cube is positioned so that only three sides are visible. The cubes on the left side and left center have two sides and a top. The cubes on the right side and right center have two sides and a bottom. It takes a moment to realize that neither shading nor shadows are used to suggest dimension or depth. Instead, it is the simple angle of lines and the interaction of color that gives these cubes the appearance of being three dimensional.
Moving from left to right, let’s take a closer look at each wall. The left side wall has a light grey background. The cube floats high on the wall causing its navy blue top, held up by bright orange and lime green sides, to be slightly cut off from view. Over on the left center’s wall, the cube’s bottom corner, formed by its olive green and bright red sides, pokes at the wall’s base trim. The cube’s jaunty tilt causes the tip of its lemon, yellow top to point up towards the left corner of the wall’s sky blue background. The lemon, yellow color reappears on the right center wall, but now as the background color. The top corner of this wall’s cube, formed by its darker red and sky blue sides, pokes at the wall’s ceiling trim. The cube has a rightward tilt causing the tip of its rusty orange bottom to point towards the wall’s lower left corner. Finally, onto the right side wall with its bright, raspberry red background. This cube sinks towards the floor, the tip of its mustard yellow bottom disappearing into the wall’s base trim. The rusty orange and sky blue sides reach up towards the wall’s upper left corner.
Let’s take a step closer to examine the layering of paint that created this work. Up close, it has a fibrous look as if the walls were covered in a tightly woven carpet. But in actuality, the paint flatly coats the walls, playing with the viewer’s perception of dimension just like the cubes do. While the dimension of the paint creates the appearance of texture, the dimension of the cubes provides a sense of motion. Looking at each individual cube, they either appear to be jumping out towards you or receding back into the void of their background color. Taking a step back to focus on the painting as a whole, it looks like a single cube bouncing from wall to wall changing colors as it goes.

Wall Drawing #541
Tiffany Punch Bowl
Tiffany Punch Bowl with Three Ladles made by the Tiffany Glass and Decorating Company in 1900
Bowl at Base – 14 1/2″ X 24″ – 65.5 lb. / ladle – 2 1/2″ X 3 1/2″ X 10″ / base 8.5 lb. / overall weight 74 lb.
Made of glass, silver, gilding, copper, and wood
Label Copy
This punch bowl was owned by Henry O. Havemeyer of New York City, and is one of Louis Comfort Tiffany’s most important works created by the Tiffany Glass & Decorating Company. Formed of Tiffany’s hand-blown Favrile glass (after the Latin word fabrilis, meaning handmade), the punch bowl has an iridescent surface reminiscent of ancient Roman glass. The gilded silver mounts are classic Art Nouveau-style C – and S – shaped scrolls. The bowl is visible in a photograph of the Tiffany Favril Glass display at the Paris World’s Fair of 1900 where Louis Comfort Tiffany won a grand prize and received the French Legion of Honor.
You cannot walk through this room of the Decorative Arts gallery without having some encounter with this punch bowl as it stands directly in the middle of the path between the two doorways. Measured from its base, the punch bowl is two feet by just over a foot. It is poised on a pedestal and resting inside a glass case that provides a 360 degree view. Every other object in the room, each beautiful and intricate in their own right, is displayed against the wall as if to defer to this iridescent punch bowl. The room is dim, but the low light creates a soft ambiance, allowing the punch bowl to truly glow.
Nothing about this punch bowl is sharp or angular, instead every detail flows and curves. Nothing about it is one distinct color, because every detail gleams in a seamless swirl of three, four, or five different luminescent hues. The glass of the bowl itself, around which all the other details revolve, is an opaque, golden yellow. A simple tilt of the head can suddenly cause streaks of rosy pink, orange, and yellowish green to glimmer across its surface.
The base and overall supporting structure of the punch bowl are made of silver, the shine of which tricks the eye at every turn making it look silver, then gold, then copper, then all three at once. The silver is engraved with marks that make it look like moving water. The base is shaped like a splash of liquid that has just landed on a surface in the form of an imperfect, six-sided star if all the points were rounded. Rising from the middle of this base is a silver column that supports the glowing bowl. The bowl itself is enmeshed in silver with a thick, fluid band that runs around the top and then streams down the sides in six slim columns that all connect to the larger, supporting middle column. This middle column is surrounded by six silver waves that surge up from the base, cresting and ready to crash into the center.
Strategically-placed glass details, the same opaque iridescence as the bowl, interrupt the flow of silver. Six evenly spaced, octopus-like tentacles reach up out of the silver base. Their glassy surface shines with a predominately bluish purple tint. Though the bowl ultimately sits on the silver middle column, these tentacles bend gracefully inward to press their spiraled tips against the base of the bowl as if they are doing all the heavy lifting. Nestled neatly into the curve of each tentacle is the arched back of one of the cresting silver waves. In the windows between each tentacle and wave, a coin-sized glass bubble dots the center column. Similar bubbles mark the middles of the six slim columns that glide down the sides of the bowl. They also stud the silver band encircling the top. These bubbles shimmer like jewels and protrude out of the silver as the engraved water lines eddy around them.
The last of the glass details are not solely decorative; they also serve a practical purpose. Three tentacles, similar in style and color to the tentacles rising from the base, extend out of the silver band at the top of the bowl. They are equally distanced with three glass bubbles between each one. Each tentacle sticks out about three to four inches, curls up to form a loop, and then twists back on itself toward the rim of the bowl. Hanging from each of the three tentacle loops is a dipper for the punch bowl. The long, thin handle of each dipper is made of silver. The actual dippers are made of glass, their insides glowing like the golden yellow of the bowl while their outsides gleam the same bluish purple as the tentacles. They are shaped like frosted cupcake tops complete with a gumdrop-like bubble in the center.

Tiffany Punch Bowl
Garden Pavillion
Garden Pavilion – Unknown artist – 19th century
114″ X 168 1/4″ X 330″ (Approx. 9 1/2 ft. X 14 ft. X 27 1/2 ft.)
White marble with brown schist and brown mottled marble inlays
Label Copy
Elegant arcaded pavilions were standard features in royal gardens and palace complexes in
India between the 17th and 19th centuries. Large examples could accommodate a ruler and his
court, assembled for the state business or entertainment. More intimately sealed pavilions, such as this one, were used for private retreat, pleasure, and contemplation.
This pavilion’s architectural style, like the garden where it once stood, owes much to the
influence of the Mughals. These rulers brought with them from Central Asia a highly developed tradition of formal gardens that incorporated exotic plantings, cooling waters and multiple structures intended for both leisure and ceremony. During the reign of Shah Jahan, patron of the Taj Mahal, whiter marble became the favored construction material for such stately structures.
Associated with wealth and prestige, the Mughals’ refined architecture was quickly adopted by India’s many princely states and endured long after the Mughals’ decline. Stylistic comparisons suggest that this pavilion was created in the 19th century in eastern Rajasthan’s princely state of Bharatour. It may have been commissioned by the ruling Maharaja or Bharatour, or by a wealthy noble from that region.
The whiter marble used to construct the pavilion is quite varied. The undersides of some pieces indicate that they were recycled from previous buildings, and the structure has been repaired several times. Some variations in the stone are, however, intentional, such as the matching grayish panels on each of the four corner piers. Bold inlays of mottled brown marble and black schist pattern the pavilions floor, at the center of which is a basin that was once fed by a gently splashing fountain. The pavilions delicate columns originally carried far more weight than they do now, including a ceiling of stone slabs and a considerable superstructure with stone brackets; deep, angles stone eaves; and possibly an observation deck surrounded by a railing.
The evocative structure is a fitting complement to this gallery’s paintings and objects, most of which were also produced for India’s princely courts. It is easy to imagine a noble seated in the pavilion leafing through an album of paintings, or a group of court ladies partaking of delicacies from jade and silver serving dishes while being serenaded by nearby musicians.
Comparable structures appear in several of the surrounding paintings, some showing the sort of patterned textiles that probably once hung from the bronze rings above this pavilions arches. These hangings could be raised or lowered depending upon the angle of the sun and the occupants’ desire for privacy.
This garden pavilion can be startling on first encounter. Afterall, it is twenty-seven and a half feet long, fourteen feet wide, nine and a half feet tall, and it takes up the majority of the room. In addition, the pavilion’s white marble appears to glow under the gallery lights, so it is not only stunning in size but also in brilliance. For an instant, it is easy to believe that you have been transported out of the museum to find yourself on a path surrounded by fragrant flowers, heading towards the pavilion for shade and a comfortable seat. In reality, the pavilion is missing it’s roof and no longer contains any plush seating areas, but this does nothing to diminish its beauty. In fact, it only further invites the imagination to recreate the full glory of the pavilion in its prime.
Let’s start with the base of the pavilion that would once have been strewn with cozy seating accesories while providing a platform to grand parties, intimate ceremonies, as well as solitary moments of contemplation. Though the majority of the pavilion is made from white marble, black schist and brown marble are used to accent particular designs, and the base is a perfect example. If you were to step into the pavilion, you would be stepping onto an intricate floor pattern. Working from the outside in, this pattern is contained by a rectangular brown marble border outlined by two slender, black schist lines, all of which are separated from each other by a few inches of white marble. Altogether, this border is nearly two feet wide, and inside of it is an elegant pattern of octagon-shaped white marble tiles connected to one another with small, white marble squares. Each tile is thinly outlined in black schist, which provides a stark contrast that allows the pattern to truly pop. In the center of the pavilion’s floor is a four foot long and three foot wide basin that interrupts the interlocking tiles. The rectangular basin has four black schist border lines around its outside edge and one final border of brown marble. Though this basin is now empty, it would once have been a splashing fountain you could have dipped your toes into on a hot day.
As with most pavilions, this one is open on all four sides. Horizontal beams connect fluidly with four corner pillars to create a smooth frame. Each corner pillar is made up of two rectangular marble slabs joined at a 90 degree angle. The outside corner of each pillar has a slim decorative column carved into it. The sides of each pillar are accented, near the base, with a simple outline of a rectangle, made with black schist, with a smaller outline inside. Protruding out of the two ends of each pillar is another set of slim columns embellished with foliage and flowers. Their purpose, however, is not entirely decorative. On every side of the pavilion, these columns form the base of a thinner frame that rests, slightly indented, inside the main structural frame. Along the top of these indented frames are evenly-spaced brass rings connected to the necks of mythological, crocodile-like creatures called makaras. These rings would have held fabric that could be rolled up or down to provide shade, protection, or privacy.
Now let’s look at the design elements between each corner pillar. There are two additional columns along the pavilion’s shorter sides and four additional columns on the longer sides. These columns all have a unified design. They start with a solid, square base, the top of which is lightly dusted by the downturned tips of a delicate ring of petals. This is followed by a ring of petals alternating in size between short and squat and tall and thin. Out of these petals sprouts a rounded column. The tips of the tall, thin petals curl ever so slightly away from the column, making it hard to believe they are made of marble. Each round column only rises three or so feet before it is capped off by a smaller petal ring. In a familiar pattern, this ring is topped by a more layered ring of petals, and out of their middle spouts a solid, square that matches the base. This is where the pattern changes, because out of the solid, square, with a flourish of fanned-out marble leaves, the column continues on in a simple rectangular form to connect with the pavilion’s thinner, indented frame. Between these rectangular segments, the columns connect to one another with exquisite archways that scallop up to centered points. The dainty profile of a leaf hugs each curve of the archway, only its tip peeling away to curl off in the opposite direction. Out of the archway’s center point grows a blooming lotus flower. The top edge of its petals kiss the indented frame above it. On either side of this lotus is a fully bloomed lotus as if from an aerial view. Trapped in the marbe of these columns and arches is the delicate essence of a garden, and that is the true magic of this pavilion.

Garden Pavillion
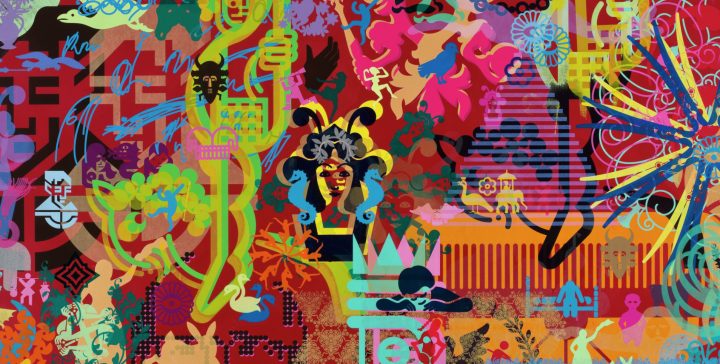
Ndebele Design
Ibala LeSindebele (Ndebele Design) – Esther Mahlangu – 2014
9’ X 15’
Acrylic on linen
Label Copy
In 2014 VMFA commissioned Esther Mahlangu to create two large-scale paintings to form a
vibrant gateway for the African Art Galleries. The most renowned contemporary artist among
South Africa’s Ndebele people, Mahlangu has transformed the art of mural painting from its
historic tradition of designs on the exterior of rural houses to projects created in a global contemporary art context. Her career was propelled in 1989 when she was invited to participate in the landmark Magiciens de la Terre exhibition in Paris. In 1991 BMW commissioned her to paint a car for their Art Car program; to date, she is the only African and only female artist included in this project.
Beyond the pride Ndebele women take in their painted houses, these residences assumed new importance during the late 19th century as statements of identity and resistance against displacement from the land by white settlers. As a young girl, Esther learned the art from her mother and grandmother. For the VMFA project, her granddaughter Marriam assisted. Esther’s vision for a composition arises in her mind’s eye, and she works without aid of preliminary sketch or straight-edge tool. Techniques vary from using a single chicken feather to etch a fine line to multi-feather clusters and artist’s brushes for the broader areas of color. Painted on linen, these works will survive indefinitely, whereas murals painted directly on building surfaces can be imperiled by renovations, overpainting, or degeneration from weather. Indeed, some of Esther Mahlangu’s most significant international mural projects now exist only through photographic documentation.
These two powerful murals create a stunning entrance to the African collection. With both measuring nine feet high and fifteen feet wide, they attract attention all the way from the Tapestry Hall. The mural on the left is more vibrantly colored and represents a modern take on the Ndebele tradition. The mural on the right is more subdued in color and adheres more closely to long-established Ndebele designs.
Let’s start with the colorful, left side mural. A roughly one foot wide border runs around the edge of the rectangular canvas. This border consists of two patterns. One pattern runs horizontally along the top and bottom of the canvas, and the other pattern runs vertically down the left and right sides. Each pattern section – top, bottom, left, and right – is enclosed within a border of its own created by a thin, white line outlined in black. This border-within-a-border separates the patterns from one another, provides a more dramatic distinction between them and the middle design, and also adds definition to the farthest edge of the canvas.
The horizontal pattern along the top and bottom is a series of triangles locked together like sharp, pointy teeth alternating between point up and point down. A thin black line outlined in white emphasizes the zig-zagging path of their zipper-like connection. The triangles vary in color between black, blue, grey, yellow, green, pink, and violet. The colors do not appear in any particular order, but none of the triangles touch another of the same color. Inside each triangle, growing out of the center of its base, is a small, white square. Connected to the outside of the square is the pointy tip of a small, white triangle. These points seem to be directing our gaze to the inside of each square where there is an even smaller square. Like the larger triangles, the color of these smaller, inside squares alternates with variety.
Let’s move on to the border pattern that runs in a vertical column down the mural’s left and right sides. A black diamond, outlined in white and then again in black, obstructs the center of the column and divides the pattern in two. These two halves are a reflection of each other, different only in color. A pink triangle is wedged into the top of the column, and a grey one is wedged into the bottom. Both are outlined in white, and they each point to the diamond. A diagonal line cuts across each half, creating a barrier between the diamond and each triangle. These diagonal lines slice from the column’s lower outside edges, near the tip of each triangle, up towards the middle inside edges, near the diamond. They are outlined in black with a continuous series of black arches bouncing through their white middles. The space above and below each diagonal line is filled with a different color. The pattern’s top half is divided between green and yellow. The bottom half is violet and pink. Color is the only difference between the mural’s left and right side borders. The mural’s left side border matches the colors described above. On the right side, the colors of the pattern’s two halves are switched, so the colors on the top half of the left side match the bottom half of the right side, and vice versa.
Now onto the middle of the mural. The background is a bright, sky blue rectangle with a white border. All four of its corners have been cut off, and a black triangle makes up the space between each blunt edge and the mural’s thick border. At the rectangle’s center is a large, salmon-pink, spiky shape outlined in black and then again in white. Let’s break this shape down into its component parts. Its core is a large square. A relatively small triangle is cut out of its top and bottom. Jutting out of either side of the square is a large horizontal crown shape. Its two outside edges cut inwards at 45 degree angles, creating triangular points. Extending from the inside valley of these triangles, the shape juts out again, past the first points, to form a second round of points. Cutting in one more time at 45 degrees, the valleys of this second round of triangular peaks almost touch. A skinny rectangle, tipped with a violet diamond, shoots out between them, creating the crown’s middle. The diamond’s tip gently pokes at the blue background’s white border. In the center of this salmon-colored shape is another combination of shapes. There is a bright green rectangle, positioned horizontally, with two funnel-like shapes, also green, sticking out of the rectangle’s left and right sides. Through the center of the rectangle is a diagonal line alternating in color between white and violet. Two yellow triangles touch their points to the top and bottom of the rectangle. This entire combination is outlined in black and then again in white.
Let’s change gears and shift our focus over to the right side mural. Instead of a border that goes all the way around the canvas, this mural has one thick band of designs that runs horizontally across the top of the canvas and two thick bands of designs that run horizontally across the bottom. All three measure between a foot and a foot in a half in width. These horizontal bands, along with the designs in the mural’s midsection, all sit against a white background.
Let’s start with the top horizontal band. It is made up of a series of horizontal lines, most of which are between one and two inches thick. The colors of the lines, in order from top to bottom, are black, white, bright green, yellow, white again, and then there is a thicker black line filled with a series of geometric patterns painted in white. This is followed again by a white line, then purple, and pink is the last line before the mural opens up to its midsection.
Before we explore the mural’s middle, let’s examine the two horizontal bands at the bottom of the canvas. We’ll start with the one just below the midsection. It is outlined in black. Inside this outline is a white line that runs horizontally along the band’s top, and directly underneath it is a horizontal black line. Between this horizontal black line and the bottom of the band is a series of diamonds and diagonal lines. This series is bookended on the right and left by triangles. A black triangle, outlined in white, is wedged into the left side with its peak pointing to the right. A blue triangle, outlined in black, is wedged into the right side and points left. Five black diamonds, outlined in white and then again in black, are fairly evenly spaced between these triangle points. On either side of each diamond is a white diagonal line outlined in black. The orientation of these diagonal lines alternates so that, if connected, they would create a continuous zig-zag in between the diamonds. The pattern is broken between the last diamond and the right end triangle. Instead of a diagonal line between them, there is a white X outlined in black, the diamond and the triangle fitting flush into its left and right sides. As for color, the pattern’s background changes between every shape and line. From left to right the colors are yellow, green, blue, purple, pink, bright green, yellow, bright blue, pink, bright green, and the triangular spaces at the X’s top and bottom are filled with yellow and red.
This brings us to the final horizontal band. It is made up of five squares and only three colors: white, grey, and black. Each square is outlined in white and shares a border with its neighboring squares, causing them to visually flow from one to the next. White lines are also used to divide up the squares internally so that each square is made up of eight triangles. These eight triangles seem to pinwheel around the square’s center point where all the internal white lines meet. Every other triangle in each square is painted black, giving them the look of windmill blades. The remaining four triangles in each square are painted grey, and each one contains darker grey designs that look like they were painted on with a finger. These designs are a combination of straight and wavy lines. Their composition within each grey triangle varies.
Now, let’s explore the mural’s midsection, which is made up of three designs. Each design is a combination of shapes and lines. The middle of the three is the largest and takes up nearly a third of the midsection. This design is centered around a black diamond outlined in white and then again in black. A green line, outlined in black, arcs above the diamond, and a yellow line, outlined in black, arcs below it. The two lines do not touch, but their arcs make an egg-like shape around the diamond. Instead of connecting in line with the egg’s center, both yellow and green angle out to continue horizontally to the left and right, extending roughly a foot and a half in either direction. From there, they each take a 90 degree turn. This causes both ends of the green line to point up, and each end of the yellow line to point down. This vertical trajectory lasts only a few inches before another 90 degree turn occurs. This time, the turn forces both ends of each line on another horizontal journey, taking them halfway back to the egg shape before each comes to a blunt stop. On the middle, outside edge of each of these last horizontal segments is a triangle, connected to the line by the tip of its point. The two green line triangles point down. The left side triangle is purple, and the right side triangle is blue. The two yellow line triangles point up, and this time, the blue triangle is on the left while purple is on the right. There are also shapes In the roughly two inch space between the yellow and green lines. The opening between them on either end is plugged with a white chevron, outlined in black, pointing its tip towards the diamond. There is also a small, red rectangle on either side, between the chevron tips and the diamond, positioned like a splint to hold the right and left sides of the two lines apart. Now for the two matching designs that flank this central design. They are both squares filled with horizontal lines in the same color order: yellow, blue, red, green. Two triangles are connected to each square. One pokes its tip into the middle, outside edge of the square’s top and the other does the same to the square’s bottom. The squares and triangles are all outlined in black. The only difference between these two side designs is the colors of the triangles. The left side is blue on top, pink on the bottom, and the right side is the reverse.
